This tutorial is adapted from Web Age course Microservices Development Bootcamp with Immersive Project.
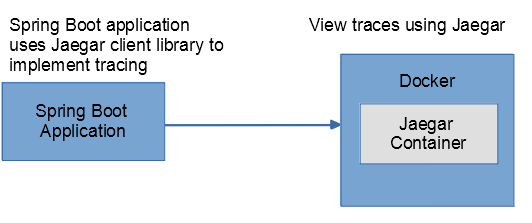
In this tutorial, you will implement instrumentation using Jaegar. You will modify an existing Spring Boot application to add tracing to it.
 Part 1 – Setting the Stage
Before you start working on this tutorial:
- Ensure Docker is installed and configured.
- Run the following commands to pull Docker images required to use Jaeger
- docker pull jaegertracing/all-in-one:1.12.0
- docker pull grafana/grafana:6.2.2
In this part, you will create a directory and copy an existing project to it.
1. Open a new Terminal window by clicking Applications > Terminal.
2. Create a directory where you will copy the Spring Boot application:
mkdir -p /home/wasadmin/TutorialWorks
3. Switch to the directory:
cd /home/wasadmin/TutorialWorks
4. Download the application from here. Unzip the existing application:
unzip /home/wasadmin/TutorialFiles/employees-rest-service
5. If request to replace the files Press A and hit Enter to replace all the files.
6. Switch to the project directory:
cd employees-rest-service
Part 2 – Explore an Existing Spring Boot Application
In this part, you will explore an existing Spring Boot application.
1. Build and run the sample project:
mvn clean install spring-boot:run
2. From Application menu, open Firefox web browser.
3. Navigate to the following URL:
http://localhost:8080/employees/
Note: Don’t forget to type in the / at the end.
The URL accesses Customers services implemented in the sample application. The service returns data in JSON format and it looks like this:
 4. In the terminal where Spring Boot application is running, press Ctrl+C to stop the application.
5. Using gedit or vi/nano text editors, browse the code in the following files:
src/main/java/com/webage/rest/model/Employee.java
src/main/java/com/webage/rest/model/Employees.java
src/main/java/com/webage/rest/dao/EmployeeDAO.java
src/main/java/com/webage/rest/conroller/EmployeeController.java
Note:
model folder contains the models (Employee and Employees)
dao folder contains Data Access Object which populates the data.
controller folder contains the REST service(s)
Part 3 – Add Jaegar Dependency and to the Project and Configure It
In this part, you will modify pom.xml and add Jaegar dependency to the project and configure a bean in the main application file which returns a tracing instance.
1. Open a Terminal window and switch to the project folder:
cd /home/wasadmin/TutorialWorks/employees-rest-service
2. Open the project’s main application file:
gedit src/main/java/com/webage/rest/SpringBootDemoApplication.java
3. After the existing import statements, add the following imports:
import io.jaegertracing.Configuration; import io.jaegertracing.internal.JaegerTracer; import org.springframework.context.annotation.Bean;
4. Inside SpringBootDemoAppliction class, after the main function, add the following code:
@Bean
public static JaegerTracer getTracer() {
   Configuration.SamplerConfiguration samplerConfig = Configuration.SamplerConfiguration.fromEnv().withType("const").withParam(1);
   Configuration.ReporterConfiguration reporterConfig = Configuration.ReporterConfiguration.fromEnv().withLogSpans(true);
   Configuration config = new Configuration("jaeger tutorial").withSampler(samplerConfig).withReporter(reporterConfig);
   return config.getTracer();
}
Note: These lines configure a bean which returns a JaegarTracing instance which will be used for tracing purpose. Also note, your application will traces will show up as “jaegar tutorial” in Jaeger. You can customize this name to whatever application name you want.
5. Save the file and exit gedit.
6. Open pom.xml:
gedit pom.xml
7. In the dependencies tag, add a new dependency:
	<dependency>
  	  <groupId>io.jaegertracing</groupId>
	  <artifactId>jaeger-client</artifactId>
	  <version>0.35.5</version>
	</dependency>
8. Save and close the file.
9. Run the following command to build your application:
mvn clean install
10. Ensure there are no errors. If there any, resolve them before proceeding to the next part of this tutorial.
Part 4 – Modify the Existing REST Service
In this part, you will modify the existing REST service/controller and write code to trace messages.
1. Open the REST service/controller file:
gedit src/main/java/com/webage/rest/controller/EmployeeController.java
2. After the existing import statements, add the following imports:
import io.opentracing.Span;
import io.opentracing.Tracer;
3. Inside EmployeeController class, add the following as the first statement:
@Autowired
private Tracer tracer;
4. Inside getEmployees method, delete the existing return statement, and add the following code:
Span span = tracer.buildSpan("get employees").start();
span.setTag("http.status_code", 201);
Employees data = employeeDao.getAllEmployees();
span.finish();
return data;
Note: Your find getEmployees method should look like this:
public Employees getEmployees()
{
Span span = tracer.buildSpan(“get employees”).start();
span.setTag(“http.status_code”, 201);
Employees data = employeeDao.getAllEmployees();
span.finish();
return data;
}
Note: These lines use the JaegarTracing object, which you configured in the main application file, to obtain a Span object. Span allows you to start the trace, optionally add some additional data in the form tags, and stop the trace
5. Save the file and close gedit.
6. Run the following command to build your application.
mvn clean install
7. Ensure there are no errors. If there any, resolve them before proceeding to the next part of this tutorial.
Part 5 – Verify Tracing in Jaegar
In this part, you will run your application, start jaegar, and verify tracing is working properly .
1. Run the following command to start up your Spring Boot application:
mvn spring-boot:run
2. Open a web browser and navigate to the following URL:
http://localhost:8080/employees/
Note: It’s the same data you saw previously. Next, you will start Jaegar and view the traces.
3. Open a new terminal.
4. Run the following command to run Jaegar in a Docker container:
sudo docker run -d –name jaegar –rm -it –network=host jaegertracing/all-in-one:1.12.0
5. Enter wasadmin as password.
6. In the web browser window, open a new tab, and navigate to the following URL:
http://localhost:16686
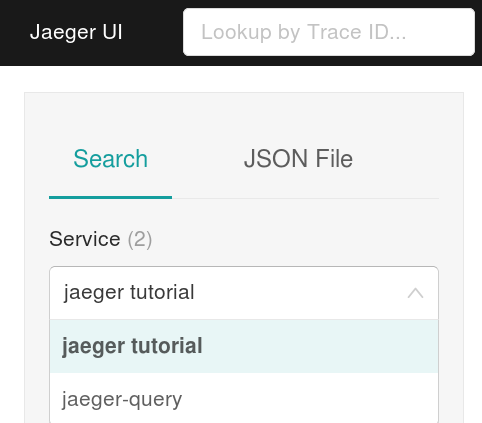
7. On the Jaegar web console, click Service dropdown and select jaegar tutorial:
 Note: If Service dropdown is blank, refresh the page in the tab where http://localhost:8080/employees/ page is open, and then refresh Jaegar web console.
Jaegar tutorial is your custom application. Jaegar query is available OOB as part of Jaegar. It allows you to make REST API calls to query Jaegar in case if you don’t want to use the web console.
8. Click Find Traces button:
 Notice the trace looks like this:
 9. Click the trace ‘jaegar tutorial‘ to view details.
It should show up like this:
 10. In Service & Operation section, click jaegar tutorial again.
Notice it looks like this:
 Notice Tags is showing your custom label http.status_code with value 201.
11. Go back to the Jaegar web console main page.
12. In the web browser tab where you have http://localhost:8080/employees/ page open, refresh the page.
13. Go back to Jaegar web console and click Find Traces.
14. Notice the traces show up like this:
Part 6 – Clean-Up
In this part, you will stop Prometheus and your application.
1. Run the following command to stop Jaegar container:
sudo docker stop jaegar
If prompted for a password, enter wasadmin
2. Switch to the terminal where Spring Boot application is running and press Ctrl+C to stop the application.
3. Close web browser tabs where Jaegar is running.
4. Close the Terminal windows.
Part 7 – Review
In this tutorial, you implemented instrumentation using Jaegar.