In this tutorial, we will create a React application that uses a custom hook to encapsulate a an article repository. Please refer to this article React Hooks Application for environment set up and other dependencies in this tutorial.
Part 1 – React Development Environment
1. Create and directory C:\Workspace and open a command prompt to C:\Workspace.
cd C:\Workspace
2. We will use the ‘npx’ utility installed along with node which allows us to run create-react-app without first installing it on the local machine:
npx create-react-app react-custom-hooks
This command may take several minutes to complete.
3. Navigate into the new directory:
cd C:\Workspace\react-custom-hooks
4. Run the application with the following command:
npm start
This starts the development server as well as ES6 /JSX transpilation. The transpilation and server are setup in watch mode which means that they are triggered automatically when files are saved. A browser window displaying the app is also opened automatically. The url being http://localhost:3000.
5. Wait for the process to fully start up and then check out the browser window. It should show the following:
Part 2 – Setting up the App
In this part you will create a React component that displays a list of articles.
1. Edit the \react-hooks-app\src\App.js file and replace its contents with the following and then save the file:
import React from 'react';
import './App.css';
export default function App() {
  return (<div className={'app'}>
    <h2>React Custom Hooks</h2>
    <li>one</li>
    <li>two</li>
    <li>three</li>
  </div>
  );
}
2. Save the file.
3. Replace the following files with copies from C:\LabFiles\hooks-app. These files can be downloaded from here.
Copy: \LabFiles\hooks-app\index.css
To: \Workspace\react-custom-hooks\src\index.css
This should overwrite the existing index.css
Copy: \LabFiles\hooks-app\App.css To: \Workspace\react-custom-hooks\src\App.css
This should overwrite the existing App.css
4. Copy the articles.json file into the project as shown below:
Copy: \LabFiles\hooks-app\articles.json
To: \Workspace\react-custom-hooks\public\articles.json
5. The app will auto-update in the browser and should look like this:
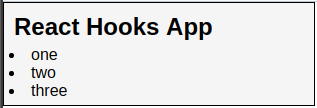 The list above is hard coded. What we want to do now is to display the data programmatically.
Part 3 – Creating a custom hook
Next, we will create a custom hook to encapsulate the list of articles.
1. Create a new file in the src directory called repository.js
2. Add the following import at the top:
import { useEffect, useState } from 'react';
3. Let’s create the hook. Add the following function below the import statement:
export default function useArticles() {
}
Hook are allowed to call other hooks. In the next set of steps, we will use the useEffect and useState hook to setup the repository.
4. In the function, let’s use a state to manage the list of articles. Add the line in bold:
export default function useArticles() {
    const  = useState([]);
}
To populate the list of article, we will use an effect hook.
5. Below the last line we’ve added, enter the following functions:
    const getArticles = function () {
        fetch('articles.json')
            .then(response => response.json())
            .then(data => {
                setArticles(data)
            }
        );
    }
6. And load the list of articles by adding the following code below the function:
useEffect(() => { getArticles() }, []);
The useArticles hook is now able to load and manage a list of article using React hooks. Next, let’s provide that list of articles to the application via a repository.
Part 4 – Adding the repository
In this part, we create a repository interface to interact with the list of articles.
1. At the end of the useArticle function, add the following constant:
const repository = {
};
2. Next, inside the curly brackets, add the list() function which will return the list of article:
        list() {
            return articles;
        },
3. Let’s provide a count() function to retrieve the number of articles in the repository:
        count() {
            return articles.length;
        },
4. Following that, we will create a helper to determine if an article id (index) is valid. Enter the following code:
        isValidId(id) {
            return id >= 0 && id < articles.length;
        },
5. We will need to be able to retrieve articles by id. Let’s create the byId() function to achieve this:
        byId(id) {
            if (this.isValidId(id)) {
                return articles;
            } else {
                return null;
            }
        },
6. We will want to add article. Let’s provide a function to achieve this:
        add(title, content) {
            setArticles();
        },
7. And finally, here’s a function to remove an article from the repository:
        delete(id) {
            articles.splice(id, 1);
            setArticles();
        },
8. We are done the repository. At the end of the useArticles function (before the closing curly bracket), add the following line:
return repository;
9. Save the file.
For the sake of reference, here’s what the completed repository.js should look like:
import { useEffect, useState } from 'react';
export default function useArticles() {
    const  = useState(initialArticles);
    const getArticles = function () {
        fetch('articles.json')
            .then(response => response.json())
            .then(data => {
                setArticles(data)
            }
        );
    }
    useEffect(() => { getArticles() }, []);
    const repository = {
        list() {
            return articles;
        },
        count() {
            return articles.length;
        },
        isValidId(id) {
            return id >= 0 && id < articles.length;
        },
        byId(id) {
            if (this.isValidId(id)) {
                return articles;
            } else {
                return null;
            }
        },
        add(title, content) {
            setArticles();
        },
        delete(id) {
            articles.splice(id, 1);
            setArticles();
        },
    };
    return repository;
}
Part 5 – Using the repository
Let’s return to our application and integrate our repository.
1. At the top of App.js, add useState to the list of imports:
import React, { useState } from 'react';
2. Let’s import our repository. Add the following line at the top:
import useArticles from './repository';
3. At the beginning of the App() function, add the following code:
const articles = useArticles();
The role of the repository is to maintain a list of article. To track the user interaction, we will rely on additional useStates. Enter the following code inside the App() function following the line we previously added:
const  = useState(
  { title: 'title1', content: 'content1' }
);
const  = useState(-1);
const selectedArticle = articles.byId(selectedArticleId)?.content || 'none';

const changeHandler = function (event) {
  const name = event.target.name;
  const value = event.target.value;
  formObject = value;
  setFormObject({ ...formObject })
}
4. Let’s now build the user interface. Amend the return statement as follows:
  return (
    <div className={'app'}>
      <h2>React Custom Hooks App</h2>
      <ul>
      </ul>
      <br /><span className={'bold'}>Selected Article:</span>
      <p>{selectedArticle}</p><br />
    </div >
  );
5. Let’s display the list of articles by inserting the following code between the <ul>:
       <ul>
        {articles.list().map(
          (article, index) => {
            return <li key={index}
              className={
                (selectedArticleId === index) ? 'selected' : ''
              }
              onClick={(event) => setSelectedArticleId(index)}>
              {article.title}</li>
          }
        )}
       </ul>
6. Save the file.
At this point, the React application should display a default list of articles:
 Part 6 – Modifying articles

In this last part, let’s add controls to allows the user to modify the list of articles.
1. Before the closing </div> of the return statement, add the following code:
      <br />
      <div className={'controls'}>
        <span className={'bold'}>Controls:</span><br />
        <button onClick={false}>Add</button>
        <button onClick={false} disabled={false} >Delete</button>
        <br />
        <input type={'text'} name={'title'}
          placeholder={'title'} value={formObject.title}
          onChange={(e) => changeHandler(e)}
        /><br />
        <input type={'text'} name={'content'}
          placeholder={'content'} value={formObject.content}
          onChange={(e) => changeHandler(e)}
        /><br />
      </div>
2. Save the file.
The application should render similar to the following image:
 We will implement the delete button.
3. Let’s ensure that the Delete button is only enabled when an article is selected. Add the code in bold to the disabled attribute:
<button onClick={false} disabled={!articles.isValidId(selectedArticleId)}>Delete</button>
4. Save the file.
5. Test the changes. Ensure that the Delete button is initially disable, but is enabled once an article is selected.
Let’s now add the code to delete an article.
6. In the onClick handler for the Delete button, add the following code:
onClick={() => articles.delete(selectedArticleId)}
7. Save the file.
8. Test the delete behavior.
Finally, let’s add the functionality behind the Add button.
9. Add the following code to the onClick handler of the Add button:
onClick={() => articles.add(formObject.title, formObject.content)}
10. Save the file.
11. Test the behavior.
12. Close all.
Part 7 – Review
In this tutorial we:
-
Created a custom hook to encapsulate and modularize the management of articles in our application
-
We integrated the article repository with a React front-end