This tutorial is adapted from Web Age Course Progressive Web Application Development Using Entity Framework Core and Blazor.
In this tutorial, you will build several Blazor components. You will load work with component lifecycle events, pass data to a child component as a parameter, and handle UI events with .NET code to change component state.
Part 1 – Getting Started
In this part, you will explore an existing project to which you will add custom Blazor components.
1. Create the folder LabWorks in the C directory and download the Lab5-starter.zip from here.
2. Extract the Lab5-starter.zip to the C:\LabWorks\ folder without adding extra folders.
3. Verify C:\LabWorks\Lab5 folder has been created.
4. In Visual Studio, open the project under the C:\LabWorks\Lab5 folder.
5. Explore the project in Solution Explorer and notice the Shared project has a couple of classes added defining Category and Product data transfer objects in the Products folder. The Client application has a ProductService created in the Services folder.
Part 2 – Work with Lifecycle Events
In this part of the lab, you will create a Blazor component that loads data into its own properties in the initialized lifecycle event.
1. Open BlazorTraining.Client → _Imports.razor
2. Import the BlazorTraining.Client.Services and BlazorTraining.Shared.Products namespaces:
@using BlazorTraining.Client.Services
@using BlazorTraining.Shared.Products
These statements add the namespaces required to use the new data transfer objects and the service from within Blazor components. If you don’t want the namespaces to be accessible by all the components, add it to the specific component(s).
3. Save the file.
4. Open BlazorTraining.Client → Pages → Index.razor.
5. Keep the @page directive and remove the remaining code.
6. Add the following code under the @page directive:
@code {
    private IList<Category> Categories;
}
7. Inside the @code directive, override the OnInitializedAsync method and in that method call the static GetCategoriesAsync method of the ProductService. Await its result and assign that result to the property you created:
protected override async Task OnInitializedAsync() {
    Categories = await ProductService.GetCategoriesAsync();
}
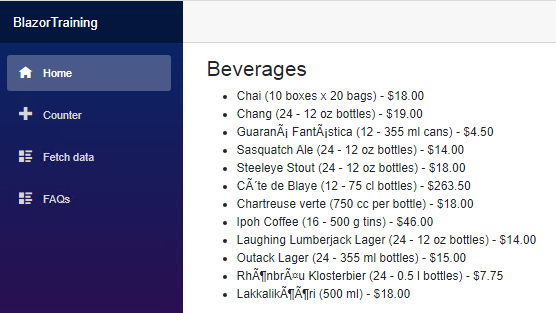
8. Under the @page directive, add the following HTML content:
@foreach (var category in Categories) {
    <h3>@category.CategoryName</h3>
}
The code loops through the categories property you created, writing out an <h3> element containing the category name, for each category.
9. Within the loop, create a nested loop to iterate over the products for the current category. Write out an <ul> with a <li> for each product. In the list item element, write out the product, its quantity per unit, and its unit price (formatted as currency.):
<ul>
    @foreach (var product in category.Products) {
        <li>
	@product.ProductName
	(@product.QuantityPerUnit) - @product.UnitPrice.ToString("C")
        </li>
    }
</ul>
10. Save the file.
11. Compile and debug the application. You are likely to encounter a runtime error (unless you were alert enough to foresee the problem and avoid it!)
The variable containing the list of categories is not instantiated until after the component is initialized, but the HTML tries to iterate the category list while being initialized.
12. Pick one of two solutions: either put a null check in the HTML and only iterate if the property is not null or initialize the variable to an empty list where you declare it:
private IList<Category> Categories = new List<Category>();
13. Save the file.
14. Compile and debug the application. The Category/Product list should appear on the main page of the application.
Part 3 – Pass Data to a Child Component
In this part of the lab, you will refactor the application to create a more maintainable design. Experience has shown that applications are more robust when they contain relatively few components that load/manage data and relatively many components that display the data.
1. In the Index.razor file, select the code inside the outermost @foreach loop, and cut it so the contents are in the clipboard and the code is deleted from the file:
Ensure you only select the code as highlighted below in bold.
@foreach (var category in Categories)
{
    <h3>@category.CategoryName</h3>
    <ul>
        @foreach (var product in category.Products)
        {
            <li>
                @product.ProductName
                (@product.QuantityPerUnit) - @product.UnitPrice.ToString("C")
            </li>
        }
    </ul>
}
2. After the code is cut, your @foreach should look like this:
@foreach (var category in Categories)
{
}
3. Save the file.
4. In the Shared folder of the Client application, add a new Razor component called CategoryView
5. Remove the <h3> HTML content.
6. Just above the @code directive, paste the code that you have in the clipboard.
The code will display one category and its products.
7. Add the following code to the @code directive:
public Category category { get; set; }
The code gives the new component property of type Category, marking it with the Parameter attribute so the value can be passed from its parent component.
8. Save the file.
9. In the Index.razor component, inside the loop, invoke the new component and pass the current category from the loop into the property you created on the new component:
<CategoryView category="category"></CategoryView>
Your updated code should look like this:
@foreach (var category in Categories)
{
    <CategoryView category="category"></CategoryView>
}
10. Save the file.
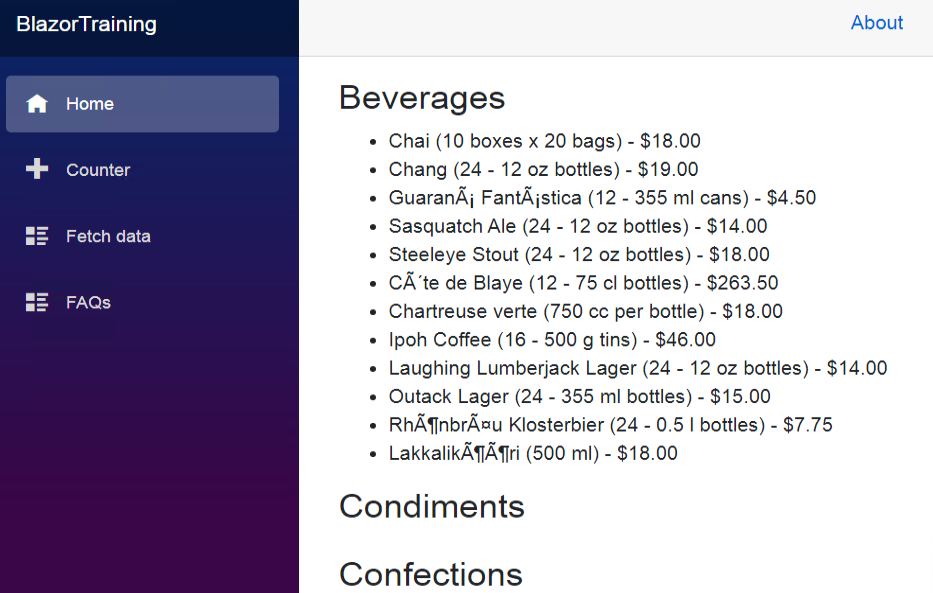
11. Build and debug the application. It should have the same appearance but is now structured in a more maintainable manner.
Part 4 – Handling UI Events
In this part of the lab, you will respond to UI events to show/hide the products for each category when the category name is clicked.
1. In the CategoryView component, inside the @code directive, add a boolean variable to track whether to display the products and initialize it with a value of false:
private bool showProducts = false;
2. Add a method that will toggle the value of the variable. Connect the click event of the <h3> heading displaying the category name to the method:
private void ToggleShowProducts() {
    showProducts = !showProducts;
}
3. Modify the <h3> tag so it looks as shown below. (Note: you are hooking up the onclick event to the custom event handler.):
<h3 @onclick="ToggleShowProducts">@category.CategoryName</h3>
At this point you can choose one of two options: either use the boolean variable to conditionally render the list of products, or use the boolean variable to conditionally add CSS classes that will animate the appearance and disappearance of the products. In the lab, you will implement the CSS animation option.
4. Modify the HTML content as highlighted below:
<h3 @onclick="ToggleShowProducts" class="clickable">
	@category.CategoryName
</h3>
<ul class="accordion @(showProducts ? "visible" : "hidden")">
	// other content is unchanged
</ul>
The above code adds a class of “clickable” to the <h3> element to show a pointer cursor when it hovers. The accordion class is added to the <ul> element. The unordered item is also conditionally displayed to achieve the desired animation.
5. Save the file.
6. Build and debug the application. Upon the first load, it should display only the categories. When any category is clicked, the corresponding products should show and then hide if clicked once again.

Part 5 – Review
In this tutorial, you practiced working with Blazor components, their lifecycle events, passing data as parameters, and handline UI events.