This tutorial is adapted from the Web Age course Snowflake Cloud Data Platform from the Ground Up.
In this tutorial, you will learn how to create databases, tables, and warehouses in the Snowflake Web UI.
Part 1 – Sign in to Snowflake Web UI
If you have not done so, sign in to the Snowflake Web UI using your credentials.
You should be logged in as a SYSADMIN user.
Part 2 – Create a Warehouse
To be able to query data in your databases, you need to set up a warehouse, which is, in essence, a compute component acting as a database engine. In this way, Snowflake decouples its storage from its database engine allowing their independent scaling, if needed.
You can create multiple warehouses that you can differentiate by their compute power and usage designation (e.g. one dedicated exclusively to data loading, while the others used to support querying small datasets, etc.) to help keep utilization tabs for auditing purposes and such like considerations.
Let’s create a small warehouse using the X-Small size.
1. Click Warehouses
Let’s review some of the details of the COMPUTE_WH warehouse already listed there. COMPUTE_WH is provided through the courtesy of Snowflake, which should be in the suspended state (in this state warehouses do not accrue any credits resulting in charges to your account).
Notice the values in the columns Auto Suspend and Auto Resume — they should be self-explanatory: the warehouse shuts down if there are no enqueued queries and automatically starts when a new query has been submitted that requires the attention of the warehouse (as it has been designated as the compute engine for the target database).
2. Click + Create
For the Name, enter LAB_WH
For Size, enter X-Small
Keep the Auto Suspend value of 10 minutes
Keep Auto Resume checked
For Comment, enter Lab Virtual Warehouse
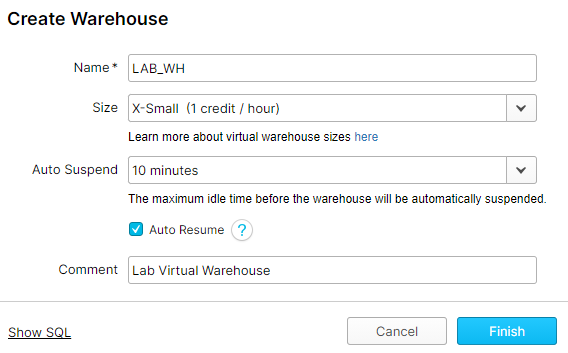
3. Click Show SQL
You should see the following output:
CREATE WAREHOUSE LAB_WH WITH WAREHOUSE_SIZE = 'XSMALL' WAREHOUSE_TYPE = 'STANDARD' AUTO_SUSPEND = 600 AUTO_RESUME = TRUE COMMENT = 'Lab Virtual Warehouse ';
4. Click Finish
The LAB_WH warehouse should be created within a few seconds.
5. The new warehouse will be in the Started state; make sure it is selected, and click the || Suspend icon to stop it.
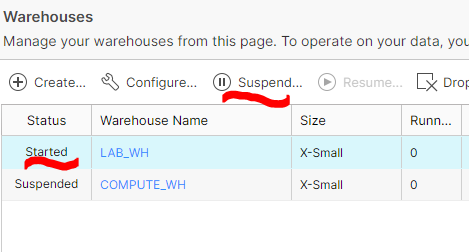 6. Make sure that LAB_WH has entered the Suspended status.
Part 3 – Create a Database
You can create a database in Snowflake using either its Web UI or the CREATE DATABASE DDL statement.
Creating a database using the UI is quite straightforward and the related steps shown below are there just for illustration purposes — we will use a DDL statement instead as it is more practical and offers more configuration options:
- Click the Databases icon in the toolbar
- Click the +Create
- In the form that pops up, enter the name of the new database and comments; then submit the form.
Now let’s see how we can create a database using a DDL statement (with Snowflake-specific extensions, though)
1. Click Worksheets and enter the following DDL statement to create a permanent database:
CREATE DATABASE LAB_DB COMMENT = 'The Lab Database' DATA_RETENTION_TIME_IN_DAYS = 1;
Note: When you run a query or command in Worksheets, you need to place the mouse cursor inside the command to indicate to Snowflake which commands in the worksheet you want to execute. You can also select multiple commands and execute them as a batch. In this way, you can have multiple commands and SQL statements on the same worksheet.
2. Click Run >
You should see the following message in the Results pane:
Database LAB_DB successfully created.
If you refresh the Database listing in the left-hand navigation pane, you will see LAB_DB there listed now.
According to Snowflake’s documentation,
“DATA_RETENTION_TIME_IN_DAYS Specifies the number of days for which Time Travel actions (CLONE and UNDROP) can be performed on the database, as well as specifying the default Time Travel retention time for all schemas created in the database. For more details, see Understanding & Using Time Travel.”
The values that you can set for DATA_RETENTION_TIME_IN_DAYS vary depending on the Snowflake edition you are using:
- For Standard Edition, this value is either 0 or 1 (the default is 1 day)
- For Enterprise Edition, you can configure this value to be from 0 to 90 for permanent databases.
You can also create transient databases, which is an “economy” database type without the Fail-safe data retention step meaning that after the changed records leave Time Travel, data is no longer recoverable and you are not further protected by Fail-safe in the event of a data loss. Transient databases, on the upside, do not incur additional storage costs. The DATA_RETENTION_TIME_IN_DAYS parameter for transient databases is 0 or 1 like in the standard edition.
Note: The full syntax of the create database DDL is
CREATE DATABASE <name>
[ CLONE <source_db>
]
3. Click LAB_DB in the left-hand side navigation pane to expand it.
You should see the two schemas that are associated with every new database:
INFORMATION_SCHEMA, and
PUBLIC
- INFORMATION_SCHEMA is a mandatory schema that contains the traditional catalog of database artifacts, such as table and column names.
- PUBLIC is the default schema there for you to use in a fully qualified SQL path, like LAB_DB.PUBLIC.<your_table_name>; you can create your own schema instead of PUBLIC
For additional information, visit Snowflake’s documentation at https://docs.snowflake.com/en/sql-reference/sql/create-database.html
Part 4 – Create Tables
1. Click Worksheets
2. Click + to add a new tabbed worksheet
3. Click the SYSADMIN icon and select the LAB_WH for the warehouse and LAB_DB for the database.
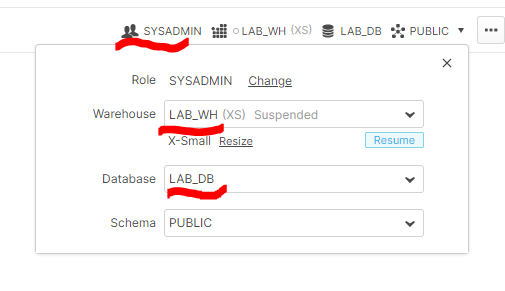 4. Select PUBLIC schema.
5. Enter (or copy and paste from the DDL_LAB_DB_TABLES.txt file) the following code:
USE DATABASE LAB_DB;
CREATE OR REPLACE TABLE ORDERS (
    ORDER_ID NUMBER(9) NOT NULL,
    EMPLOYEE_ID NUMBER(9) NOT NULL,
    CUSTOMER_ID NUMBER(9) NOT NULL,
    ORDER_DATE DATE NOT NULL,
    SHIPPED_DATE DATE,
    SHIPPED_VIA VARCHAR(40),
    SHIP_NAME VARCHAR(40),
    SHIP_ADDRESS VARCHAR(100),
    SHIP_CITY VARCHAR(20),
    SHIP_STATE_PROVINCE VARCHAR(15),
    SHIP_ZIP_POSTAL_CODE VARCHAR(10),
    SHIP_COUNTRY_REGION VARCHAR(10),
    SHIPPING_FEE NUMBER(10,2),
    TAXES NUMBER(10,2),
    PAYMENT_TYPE VARCHAR(20),
    PAID_DATE DATE,
    NOTES VARCHAR(100),
    TAX_RATE NUMBER(10,2),
    TAX_STATUS VARCHAR(10),
    STATUS_ID VARCHAR(10)
);
6. Click > Run
The table should be successfully created.
7. Click the New Worksheet title of the tab and rename it to ORDERS DDL.
 8. Keep the tab open as we are going to come back to it later on.
9. Click + to add a new tabbed worksheet
10. Select the LAB_WH for the warehouse and LAB_DB for the database.
11. Enter (or copy and paste from the DDL_LAB_DB_TABLES.txt file) the following code:
USE DATABASE LAB_DB;
CREATE OR REPLACE TABLE ORDER_DETAILS (
    ORDER_ID NUMBER(9) NOT NULL,
    PRODUCT_ID VARCHAR(100) NOT NULL,
    QUANTITY NUMBER(9) DEFAULT 1 NOT NULL,
    UNIT_PRICE NUMBER(10,2) DEFAULT 0 NOT NULL,
    DISCOUNT NUMBER(4,2) DEFAULT 0 NOT NULL,
    STATUS_ID VARCHAR(10),
    PURCHASE_ORDER_ID NUMBER(9) DEFAULT -1,
    INVENTORY_ID NUMBER (9)
);
12. Click > Run
The table should be successfully created.
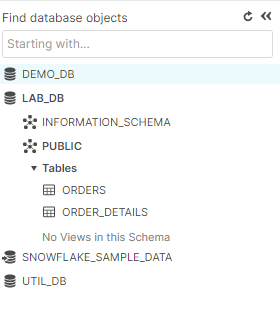
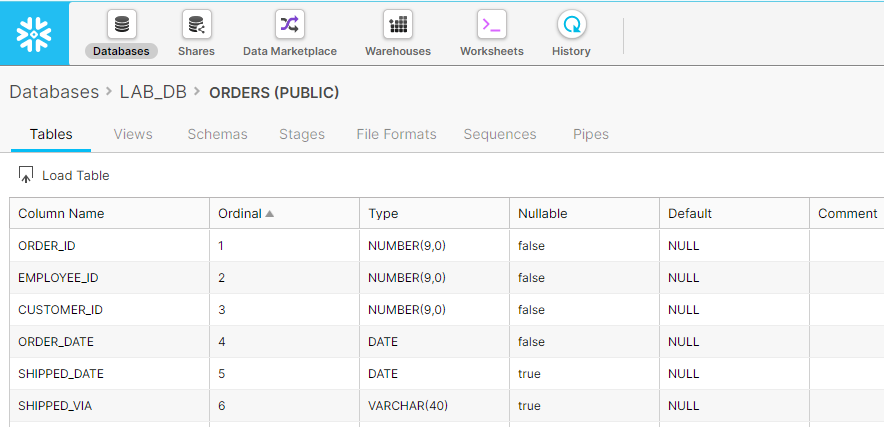
13. To verify table creation, click LAB_DB in the left-hand navigation pane and expand the PUBLIC schema.
You should see the newly created tables listed there:
 Note: During table creation, the target warehouse — LAB_WH — did not start and stays in the Suspended status.
Part 5 – Data Loading
In this lab, we will load data into the tables using the Web UI using its GUI-driven file uploading process. Be aware that this data ingestion path is only suitable for small to medium file sizes. We will review the production import-export capabilities in one of the next labs.
As expected, Snowflake SQL also supports the common set of DML commands for inserting, deleting, updating, and merging data:
- INSERT
- INSERT (multi-table insert)
- MERGE
- UPDATE
- DELETE
- TRUNCATE TABLE
Now let’s load data into the LAB_DB.PUBLIC.ORDERS table using the Web UI.
Download Order_Details and compress it in gzip format(Orders.csv.gz).
1. Select Databases > LAB_DB > ORDERS
2. Click Load Table
3. In the Load Data wizard, select LAB_WH for warehouse and click Next
4. In the Source Files step, click Select Files … (Load files from your computer)
Notice the available option here to load data from an external stage, which can be, for example, your cloud platform’s storage, like S3.
5. Select Orders.csv.gz compressed file from the location where you saved it, and click Next
6. In the File Format step, click + to define the File Format to be used (we are going to modify some of the default CSV options)
7. In the Create File Format dialog, enter the following values:
For Name: DEFAULT_GZIPPED_CSV
For Schema: PUBLIC
For Format Type: CSV
For Compression Method: Gzip
For Column Separator: Tab
For Header lines to skip: 1
Keep the other defaults.
The filled-out form should look as below:
8. Click Finish
9. Click Show SQL
You should see the following output:
PUT file://<file_path>/Orders.csv.gz @ORDERS/ui1614104008008
COPY INTO "LAB_DB"."PUBLIC"."ORDERS" FROM @/ui1614104008008 FILE_FORMAT = '"LAB_DB"."PUBLIC"."DEFAULT_GZIPPED_CSV"' ON_ERROR = 'ABORT_STATEMENT' PURGE = TRUE;
Note: The PURGE = TRUE; command instructs the COPY INTO command to delete the file upon successful loading.
10. Close the popup after reviewing the COPY INTO command.
11. Click Load
You will get an (intentional) error and your load transaction will be rolled back (on account of the ON_ERROR = ‘ABORT_STATEMENT’ command instruction).
The problem is with the CUSTOMER_ID field that should be VARCHAR (string) instead of a NUMBER.
12. Click OK to close the error message.
Unfortunately, currently, Snowflake does not allow changing a column type to a different type. You are only allowed to do changes within the same type: for instance, for the NUMBER data type you will be able to change the column precision, and for text data types you can increase the length of the column.
For more details on changing tables and views in Snowflake, visit https://docs.snowflake.com/en/sql-reference/sql/alter-table-column.html
The only way to fix our problem is to change the type in the original DDL, drop the table, and then recreate it.
Note: You can review the original DDL command using this system command:
SELECT GET_DDL('table', 'LAB_DB.PUBLIC.ORDERS');
or running this command:
DESC TABLE LAB_DB.PUBLIC.ORDERS;
You can also quickly view the schema by clicking the alias (…) next to the table name and select View Details.
13. Select the ORDERS DDL worksheet tab and change the CUSTOMER_ID column type to VARCHAR(40)
14. Re-run the DDL.
15. Re-load the ORDERS table as we did previously using the DEFAULT_GZIPPED_CSV file format template we created before.
The data should be loaded into the table this time with no problems.
After successful data loading, you should see this confirmation message:
16. Click OK
17. Repeat the data loading process for the ORDER_DETAILS table getting the records from the Order_Details.csv.gz file from the LabFiles bundle using the DEFAULT_GZIPPED_CSV file format template we created before.
Upon successful loading, you should see the following confirmation popup message:
Part 6 – Views
We will review how to create and use views in one of the subsequent labs.
Part 7 – Workspace Clean Up
1. Make sure that the LAB_WH warehouse is in suspend mode.
Part 8 – Review
In this tutorial, you learned how to create warehouses, databases, and tables in Snowflake.