In this tutorial, we will create a new project to illustrate Test Driven Development (TDD) with React and Jest. We will create a simple model that can generate a greeting and integrate it in a Reach application.
Part 1 – Creating the project
Let’s create a new project.
1. Create a directory C:\LabWork , open a command project.
2. Change into the LabWork directory :
cd C:\LabWork
3. Create a new React project using the following command:
npx create-react-app testing-app
4. Enter the new project:
cd testing-app
If desired, start your favorite text editor.
Part 2 – Creating our first test
In the spirit of TDD, let’s create a unit test to verify that our future model works correctly. The unit test will also serve as a specification for our model.
1. Using your preferred text editor, create the file src/Greeter.test.js
2. Enter the following code:
import React from 'react';
import Greeter from './Greeter'
test('provides a greeting', () => {
  const greeter = new Greeter('Ada Lovelace');
  const greeting = greeter.getGreeting();
  expect(greeting).toBe('Hello, Ada Lovelace')
});
3. Save your work.
4. Run the unit test and watch it fail:
npm run test
By default, the test running executes any files in the src directory that end with ‘.test.js’
5. Leave the test running in the command prompt window.
6. Create a new file called src/Greeter.js
7. Enter the following code:
export default class Greeter {
  constructor(userName = '') {
    this.userName = userName;
  }
  getGreeting() {
    if (this.userName) {
      return `Hello, ${this.userName}`;
    } else {
      return `Hello, Anonymous`;
    }
  }
  async getGreetingAsync() {
    return this.getGreeting();
  }
}
8. Save your work.
9. Return to the command prompt. Observer that the test now passes.
(If the test fails, verify your code from step 7)
10. Let’s complete the unit test. Add the following code at the end of src/Greeter.test.js:
test('provides a default greeting', () => {
  const greeter = new Greeter();
  const greeting = greeter.getGreeting();
  expect(greeting).toBe('Hello, Anonymous')
});
test('Can generate a greeting asynchronously', async () => {
  const greeter = new Greeter('Ada Lovelace');
  const greeting = await greeter.getGreetingAsync();
  expect(greeting).toBe('Hello, Ada Lovelace');
})
11. Save the file.
12. Return to the command prompt window. Observe that now all tests are said to pass.
Part 3 – Creating the React application
In the previous part, we performed unit tests but we did not write any React code. Now, let’s add a user interface on top of our model and test it using Jest.
1. Keep the current command prompt window open.
2. Start a second command prompt.
3. Change directory to C:\LabWork\testing-app
cd C:\LabWork\testing-app
4. Start the development server by executing the following:
npm run start
The placeholder React page comes up in the default browser.
5. Create the file src/GreeterComponent.js with the following code:
import React from 'react';
import Greeter from './Greeter'
export default class GreeterComponent extends React.Component {
  constructor(props) {
    super(props)
    this.state = {
      greeter: new Greeter(),
    }
  }
  static getDerivedStateFromProps(props, state) {
    return {
      greeter: new Greeter(props.userName)
    };
  }
  render() {
    return <div id='greet'>Message: {this.state.greeter.getGreeting()}</div>
  }
}
6. Save the file.
7. Open src/App.js and replace the placeholder code with the following:
import React from 'react'
import './App.css'
import Greeter from './GreeterComponent'
export default class App extends React.Component {
  constructor(props) {
    super(props)
    this.state = {
      userName: '',
    }
  }
  updateUserName = (event) => {
    this.setState({
      userName: event.target.value,
    })
  }
  clearName = (event) => {
    this.setState({
      userName: '',
    })
  }
  render() {
    return (
      <div id='app'>
        <h3>Input:</h3>
        <p>
          <label htmlFor='userName'>User Name: </label>
          <input type='text' id='userName' value={this.state.userName} onChange={this.updateUserName}/>
          <button onClick={this.clearName}>Clear</button>
        </p>
        <h3>Message:</h3>
        <Greeter userName={this.state.userName}/>
      </div>
    )
  }
}
8. Save the file.
9. Return to the default web browser, and ensure the following page comes up:
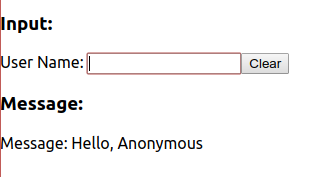 10. Test the basic behavior by entering a name and observe the message down below. Test the clear button.
11. Return to the command-prompt that is running Jest. Notice there are src/App.test.js is now failing.
We are ready to add React tests!
Part 4 – Adding React Test
In this part, we will add automated test to ensure that our application renders as expected.
1. Open src/App.test.js
2. Replace the code with the following:
import React from 'react';
import { render } from '@testing-library/react';
import App from './App';
import { fireEvent } from '@testing-library/react'
test('renders two message elements', () => {
  const app = render(<App />);
  const inputHeadings = app.getAllByText(/message:/i);
  expect(inputHeadings.length).toBe(2);
});
3. Save the file.
4. Ensure that all unit test pass.
5. Let’s add a couple more unit test. Add the following code at the end of src/App.test.js:
test('has a GreetingComponent', () => {
  const app = render(<App />);
  const greetingComponent = app.getByText(/Anonymous/i);
  expect(greetingComponent).toBeInTheDocument();
})
test('changing the input updates the message', () => {
  const app = render(<App />);
  const input = app.getByLabelText(/user name/i);
  fireEvent.change(input, { target: { value: 'Ada Lovelace '}});
  const message1 = app.getByText(/Hello, Ada Lovelace/i);
  expect(message1).toBeInTheDocument();
  const clearButton = app.getByText(/clear/i);
  fireEvent.click(clearButton);
  const message2 = app.getByText(/Hello, Anonymous/i);
  expect(message2).toBeInTheDocument();
})
6. Save the file.
7. Ensure that all test pass.
8. Quit Jest by pressing ‘q’ at the command prompt.
9. Close all.
Part 5 – Review
In this tutorial, we created unit test to ensure our business logic and our rendering is correct. This will allow up to evolve the application with the confidence that and side-effect introduced by changes in the application can be quickly detected.