Caching allows you to save a materialized RDD in memory, which greatly improves iterative or multi-pass operations that need to traverse the same data set over and over again (e.g. in machine learning algorithms.)
Note that caching is only a suggestion to Spark and may not be honored by Spark should there be not enough memory, in which case Spark will continue to apply transformations as per the RDD’s lineage to materialize it. So you cannot eat the cake and have it too.
Checkpointing cuts the umbilical cord of the RDD lineage.
You will remember that for every RDD Spark maintains its lineage (a list of its ancestors – previous RDDs used in creating this current RDD). This feature helps with the lazy materialization (building) of RDDs when they are needed (more specifically, when an action operation on the RDD is performed)
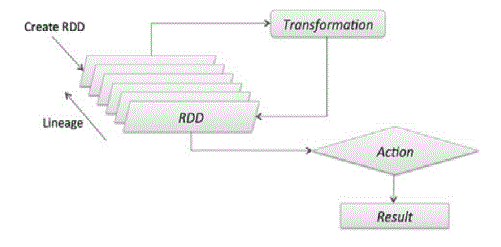
RDD lineage, while a great design idea that goes a long way toward boosting RDD’s resiliency to failures, in certain situations may start getting in the way by slowing down iterative algorithms; long RDD lineage graphs can also result in stack overflow exceptions (transformations are basically functions that are put on the Executor processing thread’s stack.)
The regular mechanism that Spark offers developer to truncate RDD lineage graphs and persist materialized RDDs into a persistence store is called the “regular” checkpointing.
Note: In this post, I will focus on caching, leaving the coverage of checkpointing for the next post.
To walk you through the steps related to caching, I will use Spark Shell version which uses the Scala REPL (Read/Eval/Print Loop) environment. If you are a Python enthusiast, pyspark will work just as well.
To demonstrate caching and checkpointing, I used CDH 5.8 QuickStart VM
I omit all the technicalities of installing the VM (I used the VMware VM image and ran it on Windows 7 in VMware Player 7.1.0) — just follow the instructions spelled out in the above CDH link. Just make sure your computer supports virtualization (a BIOS setting that may be set off, or not present at all, in which case you are out of luck) and you can allocate your VM at least 6GB RAM and 2 CPUs without starving your other applications.
CDH 5.8 QuickStart VM comes with Spark 1.6. Alternatively, you can use HDP 2.4 that also comes with Spark 1.6.
I would recommend using the PuTTY client to connect to the VM as it has very productive command line enhancements (select a command and paste it on right-click).
I leave out some of the basic and/or unnecessary details in the discussion below which I believe would not aid in your understanding of the related logic.
OK, I presume you have downloaded, installed, and successfully launched the CDH QuickStart VM on your computer.
Login as cloudera / cloudera
__1. Start the Scala Spark Shell:
 spark-shell
 __2. Load your file (whatever and wherever it might be --
 I used a CSV text file on the local file system):
 val logRDD = sc.textFile()
 __3. Apply some transformations, e.g. map, to generate your RDD lineage:
 val mappedRDD = logRDD.map( … )
In order to appreciate any performance gains of caching, let’s create a custom filter function that will introduce a slight processing delay while doing its job.
 __4. Enter the following commands (hit Enter after each line):
 def slowWorker (line: Array): Boolean = {
// Introducing a 40 mls delay for each line processing
 Thread.sleep(40)

// Use any boolean expression as a predicate; in my case,
// I filter the integer value of the 6th column in the source data set
// that is greater than or equal to 500
 line(5).toInt >= 500
 }
 __5. Enter a command to create one more RDD by applying the filter function and experience the processing slowness later on:
 val over500 = mappedRDD.filter(slowWorker(_))
 __6. Enter the following command to see the lineage graph of our final RDD:
 over500.toDebugString
You should see the following output showing our RDD’s lineage graph (your output will be similar in most details):
res8: String =
 (2) MapPartitionsRDD at filter at :35 []
 | MapPartitionsRDD at map at :31 []
 | file:// MapPartitionsRDD at textFile at :29 []
 | file:// HadoopRDD at textFile at :29 []
The lineage is not very deep, but it is OK for our purposes.
 __7. Apply an action to materialize the RDD -- I use count:
 over500.count()
Look at the bottom of the output to see the actual time it took Spark to apply all transformations preceding the count action.
In my case it was 4.165160 s (about 4 seconds)
...16/08/31 13:23:04 INFO scheduler.DAGScheduler: Job 6 finished: count at :38, took 4.165160 s
Now let’s see how caching can help us.
 __8. Enter the following command:
 over500.cache()
 __9. Repeat the count command:
 over500.count()
The first hit will still incur the materialization cost as the RDD needs to be generated before caching.
__10. Enter the following command:
 over500.toDebugString
You should see the following output showing the CachedPartitions object injected there:
 res15: String =
 (2) MapPartitionsRDD at filter at :35
 | CachedPartitions: 2; MemorySize: 37.9 KB; ExternalBlockStoreSize: 0.0 B; DiskSize: 0.0 B
 | MapPartitionsRDD at map at :31
 | file:// MapPartitionsRDD at textFile at :29
 | file:// HadoopRDD at textFile at :29

__11. Repeat the count command once more:
 over500.count()
Now you should get a much faster response (again, your results may differ):
… INFO scheduler.DAGScheduler: Job 8 finished: count at :38, took 0.026983 s
For my modestly sized data set, I got a 4.16516 / 0.026983 ~ 150X gain.
In certain situations you may want to revert caching (e.g. because the input file needs to be reloaded and your cache got stale), for that Spark offers you the unpersist() RDD method.
 __12. Enter the following command:
 over500.unpersist()
This command will evict our RDD from cache and reactivate the previous lineage.
 __13. Repeat the count command once more:
 over500.count()
You should be back to the old “slow-motion” world with full lineage graph materialization.
I will show you how to use the checkpointing facility in the next post.
Cheers, and till next time.