In this blog article, I will walk you through the steps required to quickly provision an instance of the Tomcat web server in the Amazone EC2 service. When Tomcat is up and running in EC2, you can upload your WAR (Web ARchive) file that gets automatically deployed and made available for processing HTTP requests from the Internet.
My assumption is that you have an account with Amazon Web Services (AWS) which includes the EC2 service and you have a WAR file that you want to deploy in the cloud.
Creating an EC2 Instance
1. Open your browser and sign in to the AWS Management Console.
2. Click EC2 in the Compute section to access the EC2 Dashboard page.
3. Click the Launch Instance button at the top of the page.

You will be taken to Step 1 of the instance creation workflow.
4. Click the Select button for the item listed on top to choose the 64-bit Amazon Linux AMI.
You will be transitioned to Step 2 of the flow — Choose Instance Type.
We will be just fine selecting the smallest available EC2 instance type.
5. Click the check box to the left of the first item on the list to choose the t2.micro type.
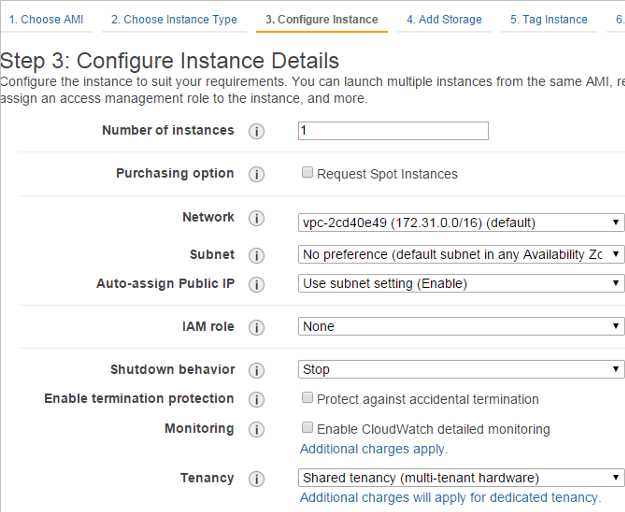
6. Click the 3. Configure Instance menu option at the top of the page. You will be presented with the following page; accept all the defaults there.
7. Click the Review and Launch button at the bottom of the page.
8. In the Boot from General Purpose (SSD) dialog that pops up, select the Continue with Magnetic as the boot volume for this instance; then click Next
You will be brought to the final Step 7: Review Instance Launch page of the EC2 instance configuration flow.
Ignore any warning messages that may appear at the top of the page.
9. Click the Launch button at the bottom of the page.
You will be prompted with the Select an existing key pair or create a new key pair dialog.
You will need a key pair to be able to have SSH passwordless access to your EC2 instance. The public key from the pair stays in EC2; the private key will need to be downloaded and securely saved on your computer for subsequent SSH connections.
Note that AWS assigns default users to instances launched from Linux AMI images as follows:
- For an Amazon Linux AMI, the user name is ec2-user
- For a RHEL5 AMI, the user name is either root or ec2-user
- For an Ubuntu AMI, the user name is ubuntu
- For a Fedora AMI, the user name is either fedora or ec2-user
- For SUSE Linux, the user name is root
10. Select the Create a new key pair option in the first drop-down box, and for the Key pair name, enter your own key name which should be only unique within your account.
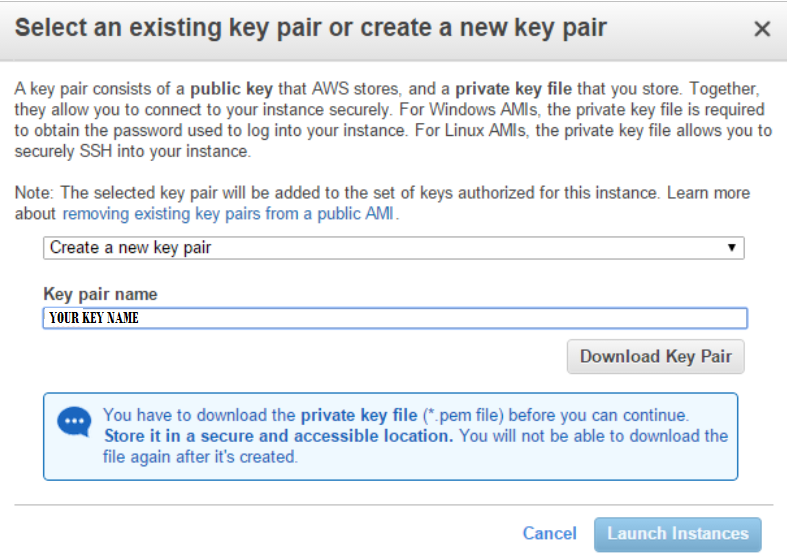
11. Click Download Key Pair.
12. Select the folder on your computer where you wish to save the file; treat the file as if it were your password.
13. Switch back to your browser and click the Launch Instances button.
The Launch Status page opens.
14. Click the View Instances button in the bottom right-hand side corner of the page.
You will be placed in the EC2 Instances page; wait until you see the “running” status (the green sphere icon) in the Instance State column of your instance.
When your instance is fully booted, it gets assigned a public IP address and a public DNS name. Be aware that neither IP nor DNS name survive instance restart – they are not static; the instance will receive a new IP address and a new DNS name when you stop and start again your instance.
To get a static IP address for your EC2 instance, you will need to use an AWS elastic IP address.
Security Groups
A security group in AWS is a set of firewall rules mostly associated with the inbound and outbound ports.
When you were creating your instance, the EC2 instance creation wizard created an associated security group for it, and, by default, it has SSH port 22 open for allowed inbound TCP connections.
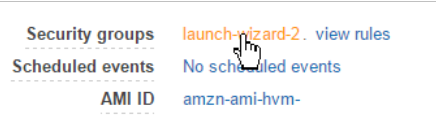
1. Click the Security groups link under the Description tab of the instance details page section (your security group link may have a different name).
On the Inbound tab of the details page section of the security group you clicked, you can see that the SSH port 22 is, in fact, open.
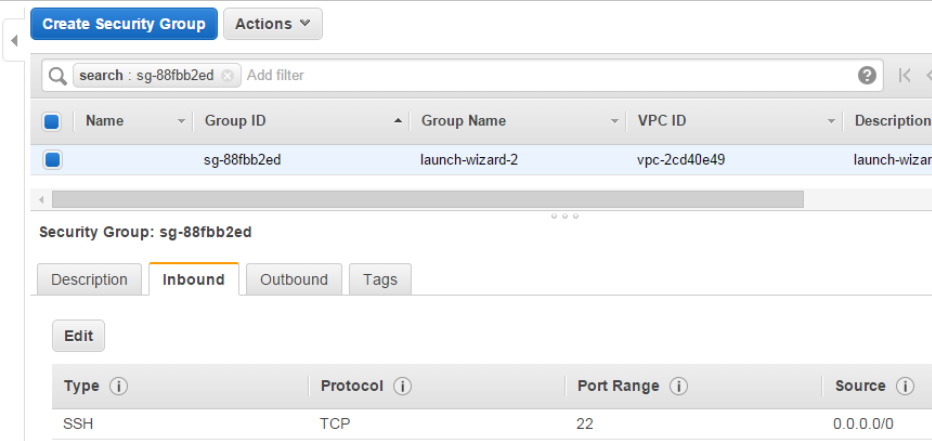
You can further tighten the rule for incoming traffic by limiting the range of source IP addresses that can reach your EC2 instances by specify a range of IP addresses in CIDR (Classless Inter-Domain Routing) notation; the 0.0.0.0/0 string that is currently used indicates that any TCP/IP client on the Internet can reach your EC2 instance on port 22.
When we provision an instance of Tomcat web server on our EC2 server, we will need to have port 8080 open for it (this is the default Tomcat’s HTTP end-point port).
2. Click the Edit button.
3. In the Edit inbound rules dialog that opens, click the Add Rule button.
4. In the new rule record that appears right below the SSH rule, select Custom TCP Rule in the Type drop-down box, enter port 8080 in the Port Range cell and make sure the Source drop down has Anywhere option selected.

5. Click Save
Connect to an EC2 Instance using MindTerm SSH Client
1. Switch to the Instances page by clicking the Instances link in the navigation panel.
Our EC2 instance is up and running with a dynamically assigned public IP address and DNS name and you can access it over SSH that we have just confirmed to be open for any inbound connection on port 22.
The private key format (pem) generated by Amazon EC2 is suitable for connecting to your EC2 instance using the Java-based MindTerm client provided by AWS that runs inside your browser. You can also use other SSH clients, e.g. many users prefer to use PuTTY, a free SSH client for Windows, which, in its present version, does not support the pem format directly — you will need to use the PuTTYgen tool that is bundled with the PuTTY complete download package to covert the pem format into the ppk key format understood by PuTTY.
We will connect to our instance using a Java SSH GUI Client that is provided courtesy of AWS, which also has the integrated SCP (Secure Copy) client for remote file copy operations.
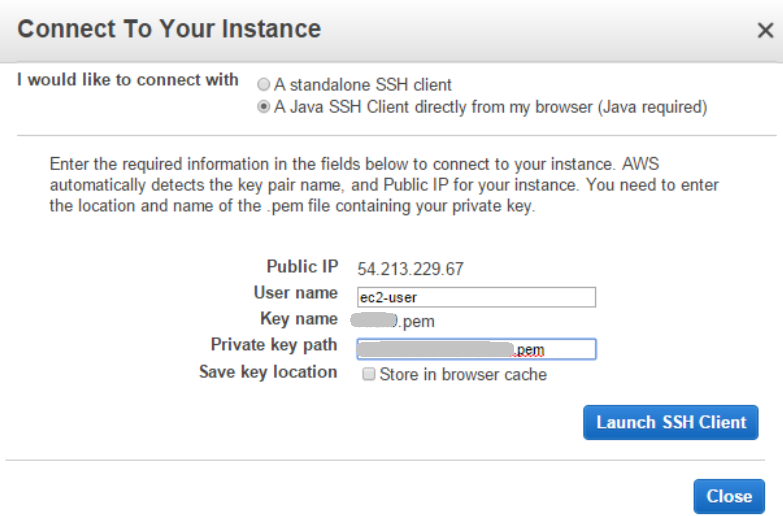
2. On the Instances page, select your instance and click the Connect button on the top of the page.

The Connect to Your Instance dialog should open which will have dynamically generated connection parameters for you to follow.
3. Select A Java SSH Client directly from my browser (Java required)
The contents of the page will change to reflect your connection choice.
4. In the Private key path box, enter the location of your private key you downloaded and saved locally in one of the previous steps.
5. Click the Launch SSH Client button. Don’t expect an immediate response as Java VM takes some time to get initialized and launched in your browser!
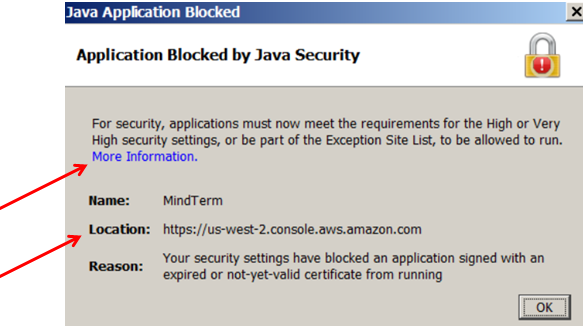
Note: If you are presented with the Java Application Blocked dialog, click the More Information link in the dialog and follow the instructions provided; basically, you will need to add the Location of you Amazon region to the Exception Site List in the Java Control Panel.
After you have sorted out the certificate handling problem as described above (if you, indeed, had one), you will be prompted with a number of confirmation dialogs related to the MindTerm Java application launched from your browser; provide a positive response (Yes, Run, OK, Accept) as appropriate. At the end, you will be placed at the command prompt of your EC2 instance in the home directory of the ec2-user user.
Note: You will notice that the instance is assigned a private IP address not reachable from the Internet as EC2 performs the needed NAT-ing translation from the public IP address you used to connect to the instance.
Provision an Instance of Tomcat Web Server
The Amazon Linux AMI does not have the Tomcat web server installed; it does have, however, Java installed which is Tomcat’s dependency we don’t need to resolve.
1. Enter the following command:
java -version
You should get the details of the Java version installed on your EC2 instance.
Now, let’s provision and install an instance of Tomcat that we can download from the Amazon application repository.
2. Enter the following command:
sudo yum install tomcat7
You should see a number of diagnostic messages printed by the YUM package manager related to downloading and installing the tomcat7 software package.
3. When you are prompted to confirm the operation with this prompt: Is this ok [y/d/N]:, enter y
Wait for the installation operation to complete.
4. Enter the following command:
sudo service --status-all
Look for the status of the tomcat7 service entry. It should appear as stopped: tomcat7 is stopped
The Tomcat webapps directory where you need to drop your WAR files is located under /usr/share/tomcat7
5. Enter the following command:
cd /usr/share/tomcat7/webapps/
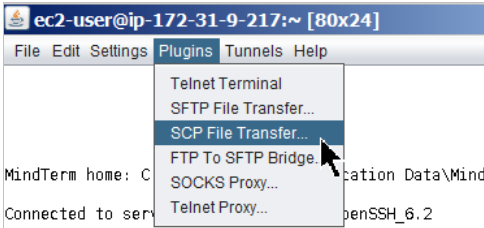
6. In the toolbar of the MindTerm app window, select Plugins | SCP File Transfer … menu option
7. In the SCP dialog that opens, change the Local System location (the left pane) to where your WAR file is located; keep the right pane at the ec2-user‘s home directory.
8. Click the –> button.
9. In a File Transfer complete confirmation dialog that pops up, click Done
10. Click the Close button in the MindTerm-SCP dialog (at the bottom right-hand corner).
11. Switch to the main MindTerm terminal window, and execute this command to copy your WAR file from the home directory to the Tomcat’s webapps directory (you are currently in the /usr/share/tomcat7/webapps/ directory):
sudo cp ~/YOUR-WAR.war .
12. Enter the following command:
sudo chgrp tomcat *
This command will make the tomcat group the owner of all files in the working directory.
13. Enter the following command to start Tomcat:
sudo service tomcat7 start
14. You can now test your deployed WAR file by navigating to this URL:
http://:8080/
Of course, for this to work, you should have the landing page for you bundle referenced in your web.xml (index.html or index.jsp, etc.)
Getting a 404 page can also be considered a positive outcome, though (kind of a silver lining in your cloud …)
And that’s all there is to it. You can say that it was as easy as pie. And the pie is in the sky (cloud).
Cleaning Up
When you are done experimenting, you may want to stop or terminate (remove) your EC2 instance and, possibly, delete the keys.