This course is adapted from the Web Age course Mastering Microservices with Spring Boot and Spring Cloud.
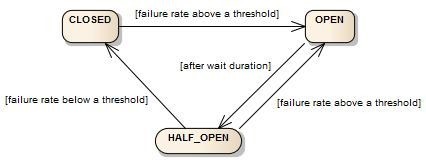
The circuit breaker is a design pattern where you stop executing some code when the previous attempt(s) have failed. For example, calling web services/REST APIs and accessing databases can fail if the backend isn’t up and running or the performance threshold isn’t met. The CircuitBreaker uses a finite state machine with three normal states:
- CLOSED
- OPEN
- HALF_OPEN
 In this tutorial, you will implement the circuit breaker in a product search application that accesses in-memory data and displays the output on the console. You will see how to use resilience4j, an open-source package, that lets you implement various features, such as retry, rate limiter, time limiter, and circuit breaker.
As part of the circuit breaker implementation, you will use count-based and time-based sliding windows. You will also see how to fall back to the cached copy of data in case of failed calls.
Part 1 – Connect to the Virtual Machine
- Open a command prompt window.
- Verify the java version installed:
java -version
Make sure you see the response shown below.

Part 2 – Getting started
In this part, you will extract a zip file that contains the starter project for this lab. You will later configure the project to use Resilience4j to implement circuit breaker.
- Open a web browser and download:
https://webagefiles.s3.amazonaws.com/custom-circuitbreaker-starter.zip
- Extract the custom-circuitbreaker-starter.zip to C:\Workspace\
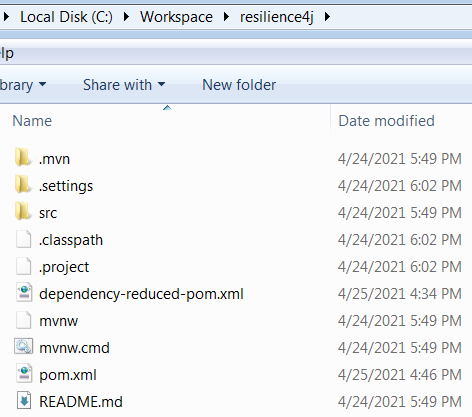
- Verify the following folder has been created:
C:\Workspace\resilience4j
It should look like this:
 Open Command Prompt window.
- Switch to the directory where you extracted the starter project.
cd C:\Workspace\resilience4j
Part 3 – Explore the starter project
In this part, you will explore the starter project’s structure. In the later parts, you will implement the circuit breaker pattern using Resilience4j.
- You should have Visual Code installed in your machine, open it and then from the menu select File → Open Folder. Expand C:\Workspace\resilience4j and click Select Folder.
Visual Code is an easy-to-navigate tool but you can use any other editor of your preference.
- View the contents of the following file available in the project folder:
src/main/java/com/circuitbreaker/model/Product.java
- View the contents of the following file:
src/main/java/com/circuitbreaker/repository/ProductRepository.java
This repository class will be used to search for products. Before we see the search logic, let’s explore the classes that will be used to simulate delay to test various circuit breaker configurations.
- Open and view the contents of the following files:
src/main/java/com/circuitbreaker/services/delays/IDelay.java src/main/java/com/circuitbreaker/services/delays/NoDelay.java src/main/java/com/circuitbreaker/services/delays/NSecondsDelay.java
IDelay is a custom interface with a method named occur. There are two implementations NoDelay and NSecondsDelay. These implementations will let you simulate a delay in your circuit breaker implementation. The custom delay method specifies how much delay, in seconds, will be simulated.
Next, let’s explore the classes that will be used to simulate failures to test various circuit breaker configurations.
- Open and explore the contents of the following files:
src/main/java/com/circuitbreaker/services/failures/IFailure.java src/main/java/com/circuitbreaker/services/failures/NoFailure.java
src/main/java/com/circuitbreaker/services/failures/ FiftyPercentFailure.java
src/main/java/com/circuitbreaker/services/failures/ SucceedXTimesFailYTimesThenSucceed.java
src/main/java/com/circuitbreaker/services/failures/ SucceedNTimesThenFail.java

These custom classes implement the fail custom method defined in IFailure. The fail method implements the logic to simulate a failure, such as no failure, failure half of the time, and success N times and then fail. Some of these classes throw a custom exception defined in the src/main/java/com/circuitbreaker/exceptions/ProductService.java file
- Next, let’s explore a custom class that will be used to search for products. This class will make use of the delay and failure implementations. Open and explore the contents of the following file:
src/main/java/com/circuitbreaker/services/ProductSearchService.java
Notice the class be default uses the NoFailure and NoDelay implementations.
IFailure potentialFailure = new NoFailure(); IDelay potentialDelay = new NoDelay();
The searchProducts method searches for products by quantity and returns the list of the products that match the search criteria. The method uses the following statements to apply a delay and failure implementation.
potentialDelay.delay();
potentialDelay.failure();
Keep in mind that by default there will be no delay and no failure since the fields are initialized that way.
Next, we have searchFlightsTakingTwoSeconds method that searches for products by quantity but always adds a 2-second delay.
The last two methods in the ProductSearchService.java file are setPotentialFailure and setPotentialDelay. Later in the lab, you will call these methods to apply different delay and failure implementations to test the circuit breaker with various configurations.
- Close all open editors.
Part 4 – Add Resilience4j dependencies
In this part, you will modify the pom.xml file and add Resilience4j dependencies.
- Open the pom.xml file for editing.
- Locate the <dependencies> tag and add the following dependencies after the existing dependencies.
<dependency>
<groupId>io.github.resilience4j</groupId>
<artifactId>resilience4j-circuitbreaker</artifactId>
<version>1.7.0</version>
</dependency>
<dependency>
<groupId>io.github.resilience4j</groupId>
<artifactId>resilience4j-core</artifactId>
<version>1.7.0</version>
</dependency>
<dependency>
<groupId>io.github.resilience4j</groupId>
<artifactId>resilience4j-all</artifactId>
<version>1.7.0</version>
</dependency>
- Save and close the pom.xml file.
Part 5 – Circuit breaker with no failure and no delay
In this part, you will implement the circuit breaker with no failure and no delay.
- Open src/main/java/com/circuitbreaker/App.java for editing.
- Locate the my_circuit_breaker_implementation() method and add the following code to it. (Note: This function is called from the main function as part of this starter project)
CircuitBreakerConfig config = CircuitBreakerConfig.ofDefaults(); CircuitBreakerRegistry registry = CircuitBreakerRegistry.of(config); CircuitBreaker circuitBreaker = registry.circuitBreaker(“productSearchService”);
ProductSearchService service = new ProductSearchService();
Supplier<List<Product>> productsSupplier = () -> service.searchProducts(300); Supplier<List<Product>> decoratedProductsSupplier = circuitBreaker.decorateSupplier(productsSupplier);
displaySearchResult(decoratedProductsSupplier);
In these lines, you are performing the following steps:
- use the default circuit breaker
- register the circuit
- configure your service to simulate no failure and
- execute the product search call method as a lambda expression – a Supplier of List<Product>.
- decorate the Supplier with the circuit breaker functionality by calling the decorateSupplier() method
- display results 20 times by calling the custom displaySearchResult method (defined in java file).
- Save the file.
- In the command prompt, run the following command to build your application.
mvnw package
You will see a BUILD SUCCESS message.
Run the application by running the following command:
java -jar target/circuitbreaker-1.0-SNAPSHOT.jar

Part 6 – Failure with no delay
In this part, you will implement the count-based sliding window circuit breaker with the following configuration:
sliding window type: count-based sliding window size: 10
failure rate threshold: 70%
- In App.java, locate the my_circuit_breaker_implemntation() method and modify it as shown in bold below.
CircuitBreakerConfig config = CircuitBreakerConfig
.custom()
.slidingWindowType(SlidingWindowType.COUNT_BASED)
.slidingWindowSize(10)
.failureRateThreshold(70.0f)
.build();
CircuitBreakerRegistry registry = CircuitBreakerRegistry.of(config); CircuitBreaker circuitBreaker = registry.circuitBreaker(“productSearchService”);
ProductSearchService service = new ProductSearchService(); service.setPotentialFailure(new SucceedNTimesThenFail(3));
Supplier<List<Product>> productsSupplier = () -> service.searchProducts(300); Supplier<List<Product>> decoratedProductsSupplier = circuitBreaker.decorateSupplier(productsSupplier); displaySearchResult(decoratedProductsSupplier);
In these lines, you are performing the following steps:
- use a custom circuit breaker configuration that is count-based, with a sliding window size of 10, and a 70% failure rate
- configure the product search service with that should succeed 3 times and fail
- Save the file.
- Build and run the application using the instructions from a previous part of this lab.
Part 7 – Slow calls with no failure scenario
In this part, you will implement the count-based sliding window circuit breaker with the following circuit breaker configuration:
sliding window type: count-based
sliding window size: 10
slow call rate threshold: 70%
service potential delay: 2 seconds
- In App.java, locate the my_circuit_breaker_implemntation() method and modify it as shown in bold below. (Note: Don’t forget to delete the cross-out statements)
CircuitBreakerConfig config = CircuitBreakerConfig
.custom()
.slidingWindowType(SlidingWindowType.COUNT_BASED)
.slidingWindowSize(10)
.slowCallRateThreshold(70.0f)
.slowCallDurationThreshold(Duration.ofSeconds(2))
.build();
CircuitBreakerRegistry registry = CircuitBreakerRegistry.of(config); CircuitBreaker circuitBreaker = registry.circuitBreaker(“productSearchService”);
ProductSearchService service = new ProductSearchService(); service.setPotentialFailure(new SucceedNTimesThenFail(3)); service.setPotentialDelay(new NSecondsDelay(2));
Supplier<List<Product>> productsSupplier = () -> service.searchProducts(300); Supplier<List<Product>> decoratedProductsSupplier = circuitBreaker.decorateSupplier(productsSupplier);
displaySearchResult(decoratedProductsSupplier);
- Save the file.
- Build and run the application using the instructions from a previous part of this lab.
Notice the service has a delay of 2 seconds. The first 10 calls succeed but since the service is running very slow, therefore, after the first 10 calls the remaining calls fail.
Part 8 – Slow calls with failures scenario
In this part, you will implement the count-based sliding window circuit breaker with the following circuit breaker configuration:
sliding window type: count-based sliding window size: 5
failure rate threshold: 30% slow call rate threshold: 30%
service potential delay: 2 seconds
service potential failure: succeed 10 then fail
- In App.java, locate the my_circuit_breaker_implemntation() method and modify it as shown in bold below.
CircuitBreakerConfig config = CircuitBreakerConfig
.custom()
.slidingWindowType(SlidingWindowType.COUNT_BASED)
.slidingWindowSize(5)
.failureRateThreshold(30.0f)
.slowCallRateThreshold(30.0f)
.slowCallDurationThreshold(Duration.ofSeconds(1))
.build();
CircuitBreakerRegistry registry = CircuitBreakerRegistry.of(config); CircuitBreaker circuitBreaker = registry.circuitBreaker(“productSearchService”);
ProductSearchService service = new ProductSearchService(); service.setPotentialFailure(new SucceedNTimesThenFail(10)); service.setPotentialDelay(new NSecondsDelay(2));
Supplier<List<Product>> productsSupplier = () -> service.searchProducts(300); Supplier<List<Product>> decoratedProductsSupplier = circuitBreaker.decorateSupplier(productsSupplier);
displaySearchResult(decoratedProductsSupplier);
- Save the file.
- Build and run the application using the instructions from a previous part of this lab.
Notice the service has a delay of 2 seconds. The first few calls (less than 5) and the rest fail since the service is slow.
Part 9 – Time-based sliding window scenario
In this part, you will implement the time-based sliding window circuit breaker with the following circuit breaker configuration:
sliding window type: time-based
sliding window size: 10
minimum number of calls: 10
slow call rate threshold: 70%
service call duration threshold: 1 second
service potential delay: 1 second
- In App.java, locate the my_circuit_breaker_implemntation() method and modify it as shown in bold below. (Note: Delete the crossed-out statement).
CircuitBreakerConfig config = CircuitBreakerConfig
.custom()
.slidingWindowType(SlidingWindowType.TIME_BASED)
.minimumNumberOfCalls(10)
.slidingWindowSize(10)
.slowCallRateThreshold(70.0f)
.slowCallDurationThreshold(Duration.ofSeconds(1))
.build();
CircuitBreakerRegistry registry = CircuitBreakerRegistry.of(config); CircuitBreaker circuitBreaker = registry.circuitBreaker(“productSearchService”);
ProductSearchService service = new ProductSearchService(); service.setPotentialFailure(new SucceedNTimesThenFail(10)); service.setPotentialDelay(new NSecondsDelay(1));
Supplier<List<Product>> productsSupplier = () -> service.searchProducts(300); Supplier<List<Product>> decoratedProductsSupplier = circuitBreaker.decorateSupplier(productsSupplier);
displaySearchResult(decoratedProductsSupplier);
- Save the file.
- Build and run the application using the instructions from a previous part of this lab.
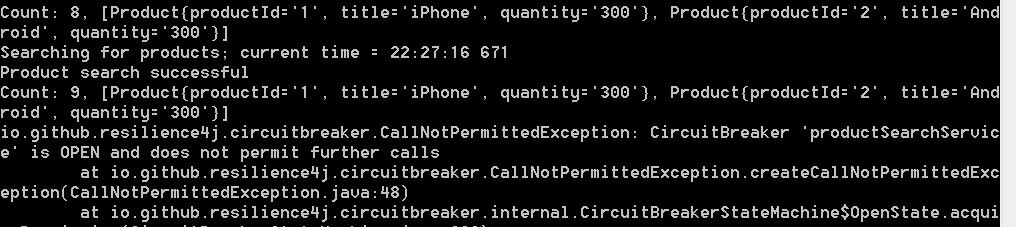
Notice the first 10 calls in the first 10 seconds succeed and then the rest fail.
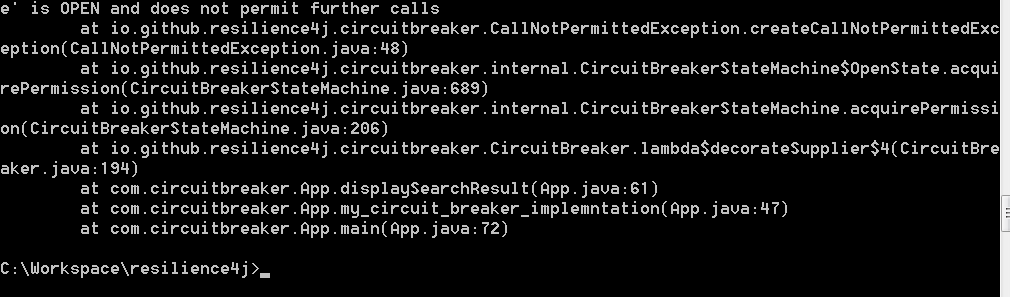
Part 10 – Disabling writing of the stack trace
In the console output, you must have noticed the failed calls write the trace to the log/console. In this part, you will display the stack trace so the failed attempts don’t write the entire stack trace to the log.
- In App.java, locate the my_circuit_breaker_implemntation() method and modify it as shown in bold below.
CircuitBreakerConfig config = CircuitBreakerConfig
.custom()
.slidingWindowType(SlidingWindowType.TIME_BASED)
.minimumNumberOfCalls(10)
.slidingWindowSize(10)
.slowCallRateThreshold(70.0f)
.slowCallDurationThreshold(Duration.ofSeconds(1))
.writableStackTraceEnabled(false)
.build();
… // keep the rest of the code as-is
- Save the file.
- Build and run the application using the instructions from a previous part of this lab.
Notice the failed calls don’t write the entire stack trace.
Part 11 – Implementing Fallback
When the calls fail, it’s possible to use the cached copy of the data and that is known as the fall back. In this part, you will implement fallback in the circuit breaker.
- In App.java, locate the my_circuit_breaker_implemntation() method and modify it as shown in bold below. Keep the remaining lines as-is.
Supplier<List<Product>> productsSupplier = () -> service.searchProducts(300);
Supplier<List<Product>> decoratedProductsSupplier = Decorators
.ofSupplier(productsSupplier)
.withCircuitBreaker(circuitBreaker)
.withFallback(Arrays.asList(CallNotPermittedException.class), e -> this.getProductSearchResultsFromCache(300))
.decorate();
displaySearchResult(decoratedProductsSupplier);
- Save the file.
- Build and run the application using the instructions from a previous part of this lab.
Notice the first 10 calls in the first 10 seconds succeed and then rest fail, BUT, this time around data from the cache is utilized for the failed calls
Part 12 – Clean-Up
- Close the Command Prompt window.
Part 13 – Solution
You can download the solution from:
https://webagefiles.s3.amazonaws.com/solution-resilience4j.zip
Part 14 – Review
In this tutorial, you utilized Resilience4j to implement the circuit breaker pattern.