This tutorial is adapted from the Web Age course Comprehensive Angular 10 Programming Training.
This tutorial uses the book store project which can be downloaded from here.
Part 1 – Get Started
1. Shut down all VS Code and terminal windows.
2. Terminate any backend web service server that might have been started for a previous lab.
3. Open the book-store folder in VS Code.
4. In VS Code open a ‘Command prompt’ terminal and navigate (if needed) to the book-store directory. This terminal will be for the Restful Books Web Service.
5. From the terminal run:
npm install
6. From the terminal run:
npm run rest-server
You should get the following output:
> rest-client@0.0.0 rest-server C:\LabFiles\debugging-lab\book-store
> json-server --port 3000 --watch ./rest-server/books.json
  \{^_^}/ hi!
  Loading ./rest-server/books.json
  Done
  Resources
  http://localhost:3000/books
  Home
  http://localhost:3000
  Type s + enter at any time to create a snapshot of the database
  Watching...
7. In VS Code open a SECOND ‘command prompt’ terminal and navigate (if needed) to the book-store directory. This terminal will be for the Book-Store application.
8. From the terminal run:
npm start
You should get the following output:
> rest-client@0.0.0 start C:\LabFiles\debugging-lab\book-store
> ng serve --proxy-config proxy.config.json
10% building 3/3 modules 0 active Proxy created: /books  ->  http://localhost:3000
 Subscribed to http-proxy events:
chunk {main} main.js, main.js.map (main) 38.5 kB
chunk {polyfills} polyfills.js, polyfills.js.map (polyfills) 141 kB
chunk {runtime} runtime.js, runtime.js.map (runtime) 6.15 kB
chunk {styles} styles.js, styles.js.map (styles) 12.4 kB
chunk {vendor} vendor.js, vendor.js.map (vendor) 3.01 MB
Date: 2021-08-17T15:52:16.298Z - Hash: 66ec531babaacbb1f9c2 - Time: 8905ms
** Angular Live Development Server is listening on localhost:4200, open your browser on http://localhost:4200/ **
: Compiled successfully.
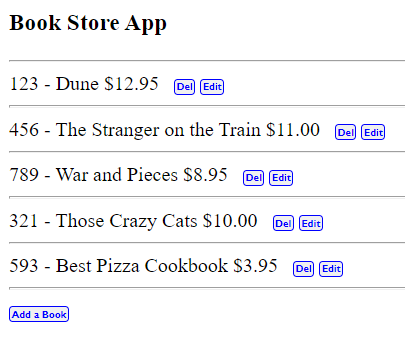
9. Open a browser and enter the URL: http://localhost:4200 and make sure the following operations can be performed in the app:
- Add a book
- Delete a book
- Edit a book
The app should look like this in the browser:

10. Open the browser’s developer tool (F12) and the Console pane.
11. Before you continue, fix any errors you find in the console.
Part 2 – Use Logging for Debugging
Logging information to the browser console provides an easy way to see what is going on in an application. The browser’s ‘console’ object has four methods for logging each of which is easily distinguished from the others based on their background color.
console.log(msg) – prints output with a plain background
console.info(msg) – prints output with a plain background
console.warn(msg) – prints output with a yellow background
console.error(msg) – prints output with a red background
In this lab section we will insert log statements into the code that will make it easier to debug the application.
To get started we will add a plain message whenever one of the application’s components is created.
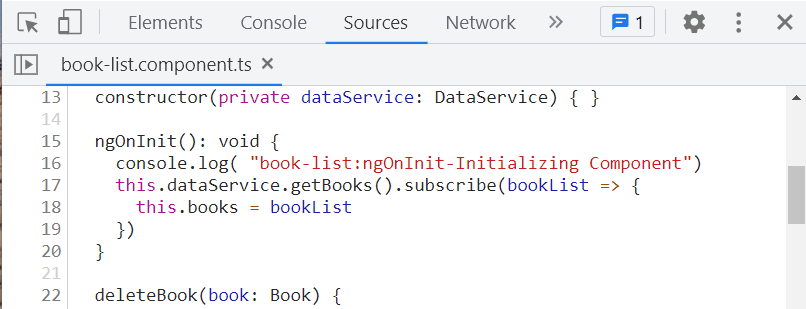
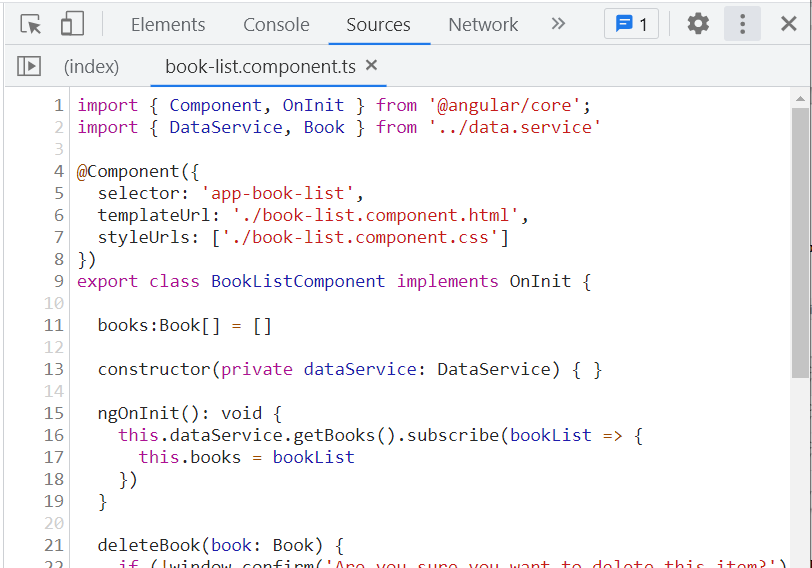
1. Edit book-list.component.ts
2. Find the following bit of code:
ngOnInit(): void {
   this.dataService.getBooks().subscribe(bookList=> {
     this.books = bookList
   })
}
3. Add the logging statement (shown in bold below):
  ngOnInit(): void {
    console.log( "book-list:ngOnInit-Initializing Component")
    this.dataService.getBooks().subscribe(bookList => {
      this.books = bookList
    })
  }
4. Save book-list.component.ts
5. Edit add-book.component.ts.
6. Find the following bit of code:
  ngOnInit(): void {
  }
  addBook() {
    this.dataService.addBook(this.book).subscribe(_ => {
      //Go back to the home page
      this.router.navigate(['/'])
    })
  }
7. Add the logging statements as shown in bold below:
  ngOnInit(): void {
    console.log("add-book:ngOnInit-Initializing Component")
  }
  addBook() {
    console.info("add-book::addBook-Saving New Book")
    this.dataService.addBook(this.book).subscribe(_ => {
      //Go back to the home page
      this.router.navigate(['/'])
    })
  }
8. Save add-book.component.ts
9. Edit edit-book.component.ts.
10. Find the following code:
updateBook() {
  this.dataService.saveBook(this.book).subscribe(_ => {
    //Go back to the home page
    this.router.navigate(['/'])
  })
}
ngOnInit(): void {
  this.activeRoute.paramMap.subscribe(params => {
    let id = +params.get('id')
    this.dataService.getBook(id).subscribe(book => {
      this.book = book
    })
  })
}
11. Add the logging statements as shown in bold below:
updateBook() {
  console.info("edit-book:updateBook-Save Book Changes")
  this.dataService.saveBook(this.book).subscribe(_ => {
    //Go back to the home page
    this.router.navigate(['/'])
  })
}
ngOnInit(): void {
  console.log("edit-book:ngOnInit-Initializing Component")
  this.activeRoute.paramMap.subscribe(params => {
    let id = +params.get('id')
    this.dataService.getBook(id).subscribe(book => {
      this.book = book
    })
  })
}
12. Save edit-book.component.ts
13. Check the compile terminal and fix any errors you see there.
14. Open the developer’s tools and click on the ‘Console’ tab.
15. Refresh the application in the web browser.
16. The following will appear in the console output:

From this output we can see that the book-list component has been initialized.
17. Clicking on the link book-list.component.ts:16 will open up the source file for the component in the ‘Sources’ tab of the developer’s tools:

18. Return to the ‘Console’ by clicking on the ‘Console’ tab.
19. In the applications, click on the “Add a Book” button below the book list.
20. The following will appear in the console output:

From this log statement, we can see that the add-book component has been initialized.
The application screen also changes to the add a book screen:


21. Enter some values in the input fields:


22. Click on the “Save” button.
23. The following two log statements appear in the console output:


From these log statements we can see that:
- The addBook method of the add-book class was called to save a new book
- The book-list component was initialized
Next, we are going to introduce a bug in the application and see how we can find the bug using the output from the browser console.
24. Edit data.service.ts
25. Find the following code:
saveBook(book: Book): Observable<any> {
  return this.http.put(`/books/${book.id}`, book)
}
26. Edit the code. Change `/books/…` to `/book/…` (remove the ‘s’ from books)
saveBook(book: Book): Observable<any> {
  return this.http.put(`/book/${book.id}`, book)
}
27. Save data.service.ts
28. Refresh the application in the browser
29. Navigate back to the app’s home page (if needed)
30. Click on the ‘Edit’ button on the first book in the list:

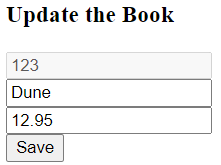
31. Click on the ‘Save’ button
32. The following will appear in the console output:

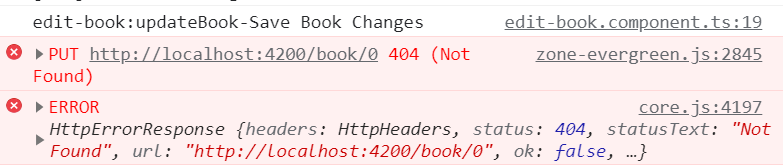
From the log output we can see that updateBook() has been called but the “PUT …” call to the books REST service returned with status 404-Not Found. It failed to find a record to update.
33. Click on the edit-book.component.ts:19 link. It will open the component’s code in the browser’s Sources tab:
updateBook() {
  console.info("edit-book:updateBook-Save Book Changes")
  this.dataService.saveBook(this.book).subscribe(_ => {
    //Go back to the home page
    this.router.navigate(['/'])
  })
}
From here we can see that the line after the log statement calls the dataService.saveBook(…) method.
34. With the Sources tab open, enter Ctrl-P, then type “data.service.ts” and hit enter. This will bring up the data service in the sources tab.
35. Find the saveBook(…) method in the data service code.
saveBook(book: Book): Observable<any> {
  return this.http.put(`/book/${book.id}`, book)
}
This is the code we need to inspect.
36. Go back to your editor and open the data.service.ts file for editing.
37. Modify the code as shown below so it will output the URL being passed to http.put.
saveBook(book: Book): Observable<any> {
  let url:string = `/book/${book.id}`
  console.info("data.service:saveBook:url=" + url)
  return this.http.put(url, book)
}
38. Save data.service.ts
39. Refresh the app in the browser.
40. Go to the main page.
41. Click edit on the first book in the book list.
42. Click on the “Save” button in the “Update the Book” screen.
43. Select the Console tab.
44. The console output will include these statements:


The second statement shows the url that is being sent to the http client’s ‘put’ method.
If its not clear yet what is wrong with the URL we could try it in a browser or compare it to the required URL listed in the Book REST server’s documentation. Eventually we will determine that the problem is that the URL should include the word ‘books’ not just ‘book’.
45. Fix the code by changing the URL string to use the plural: ‘books’
let url:string =`/books/${book.id}`
46. Save data.service.ts
47. Try the operation again and make a change to the book title before hitting “Save” This time you should be able to save the file without any errors.
Part 3 – Simulate a Typescript Compile Error
1. In VS Code open src/app/edit-book/edit-book.component.ts.
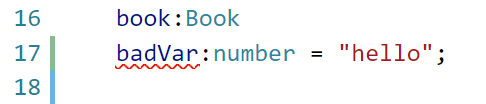
2. In the EditBookComponent class, add a variable with obvious compilation error.
badVar:number = "hello";
You can add this var before the “constructor()” line.
This statement tries to assign a string to a number type variable. It should produce a TypeScript compile error.
Even before you save your changes the editor should indicate that something is wrong by placing a red wavy line under the variable name:

3. Save changes.
4. Take a look at the terminal where the app is being compiled (not the one running the Rest server).
You should see this message:


5. Remove the newly added variable and save changes.
6. Check the compile terminal and make sure that there are no other issues.
The output should include:
: Compiled successfully.
7. Close the edit-book.component.ts file.
Part 4 – Simulate Angular Component Template Errors
When it comes to a syntax error in templates some issues are reported by the dev server when it compiles the typescript code, other issues are reported by the browser console, and some are not reported at all. Let’s explore this.
1. Open book-list/book-list.component.html.
2. Locate the following bit of code:
<button ="['/add-book']">Add a Book</button>
3. Change routerLink to routerLinkxxx.
<button [routerLinkxxx]="['/add-book']">Add a Book</button>
The routerLink is a directive supplied by the RouterModule. Angular locates the string”routerLink” in the module and applies its associated code. Renaming it with an incorrect spelling will cause Angular to output an error when it tries to compile the component template.
4. Save book-list.component.html
5. Check the compile terminal, you should see the problem reported by the dev server.

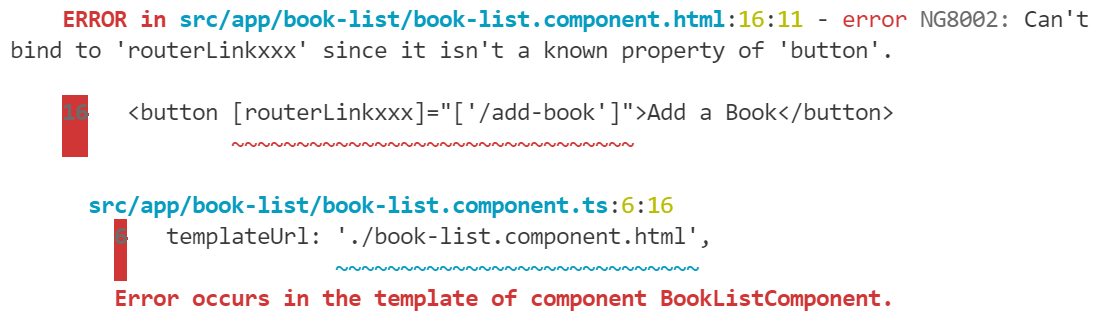
Notice how the error points to the location of the problem as being in the “template of component BookListComponent’.
6. Change “routerLinkxxx” back to its original spelling and save the file.
Next we will simulate a different template error.
7. In the same file (book-list.component.html) Change the first *ngIf (on line 4) to *if.
<div *if="books.length > 0">
8. Save the file.
9. Check the compile window. You will notice that even with this change the app has compiled without errors.
: Compiled successfully.
10. Now check the application in the browser. Open the developer’s tools and console if not already open. You should see this error in the console window:


This means that Angular can’t find an ‘if’ directive when checking the component template at runtime.
Important
During development always watch the dev server output as well as the browser console. Problems can be reported in either of these places.
11. Fix the problem (change if back to ngIf) and save.
12. Check the compile terminal and the browser console and make sure the error has been fixed.
Next we will simulate another type of error in the component template which, due to its nature, is not caught by either the compilation or the runtime template checking.
13. Find the following bit of code in the book-list.component.html file:
{{book.isbn}}-{{book.title}}
14. Change book.isbn to book.isbnxxx.
{{book.isbnxxx}} - {{book.title}}
15. Save the file.
16. Check the compile terminal and the browser console. Neither of these will show an error this time.
17. Take a look at the application itself in the browser: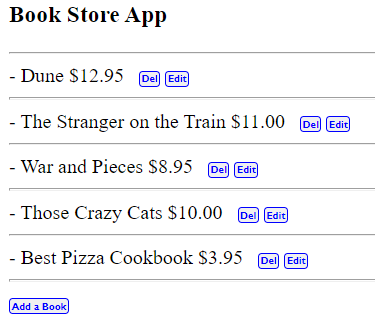
Notice that the ISBN number which should be visible to the left of each book title no longer appears.
In this case the mis-spelled “book.isbnxxx” can’t be found but the application fails silently (without error messages) and does not display the isbn.
18. Fix the spelling mistake and save the file. Once the application has refreshed the ISBN numbers should again be visible:
 Next we will investigate the use of breakpoints.
Part 5 – Using Break Points
Learning how to put a break point in Typescript code is an essential skill. This will help you investigate difficult problems using the debugger tool.
Breakpointing is something that is done in a debugger tool. When working with web applications we use the debugging tool that comes with the browser.
We will put a break point in the deleteBook() method of the book-list.component.ts file.
1. Make sure that:
- The book store application is up and running in your browser
- The browser’s developer’s tools are open as well (F12)
 2. In the browser’s developer tool, click the Sources tab.

3. Enter the keystroke Ctrl+P (Cmd+P in Mac) this will open up the code file search:
4. Start typing “book-list”, the search box will narrow the choices based on your input.
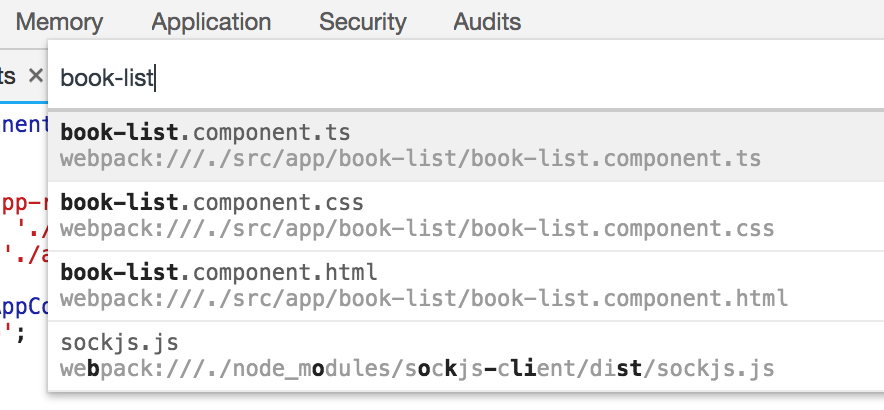 5. Click on book-list.component.ts to select it. Note that we are opening the *.ts typescript file and not the *.html file.
6. Find the deleteBook() method and put a break point on the first line of code in the method method by clicking on its line number in the left hand margin.
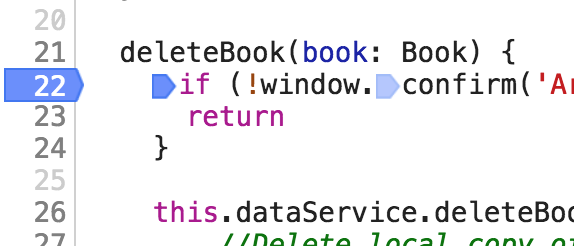
Now whenever the deleteBook() method is called the debugger will stop execution at the specified (breakpointed) line.
7. In the application, click the DELETE button for a book. Execution should now halt at the break point. You will see a note pop up over the application and the breakpointed line will be highlighted in the Sources tab:
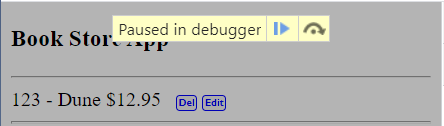

8. The debug area of the developer’s tools should look like this :
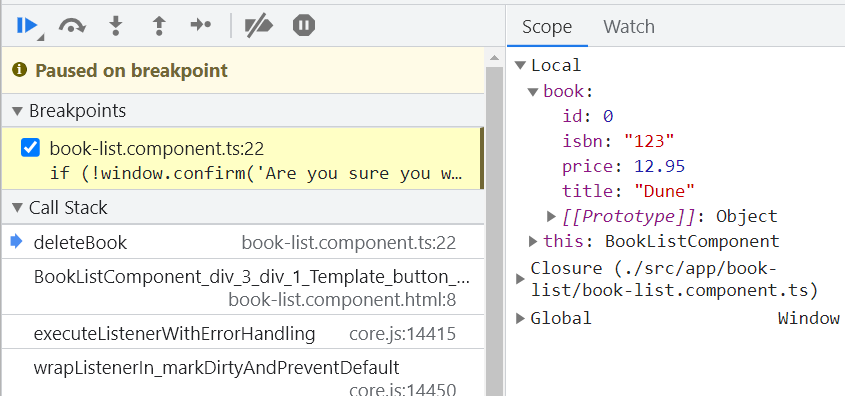
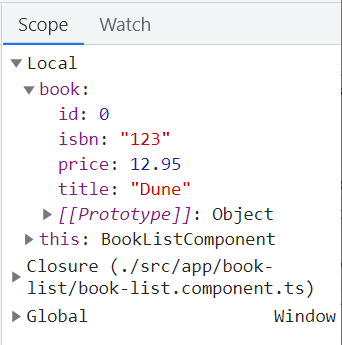
9. In the variables pane under local Scope you should be able to inspect the book variable. The this variable points to the instance of BookListComponent.
 10. Hit the resume button to continue then click OK or Cancel.
Part 6 – Visually Inspect a Component
This is an easy way to inspect the internal state of a component without using a debugger. We will now inspect the instance of EditBookComponent.
1. In the application, click the EDIT button for a book. You will now be routed to the EditBookComponent and the title on-screen will say “Update the Book”.
 2. In the browser’s developer tool, click the Elements tab.
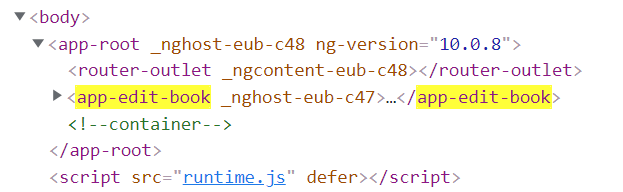
3. Hit Control+F and search for app-edit-book and locate the <app-edit-book> tag.
4. Right click the tag and from the menu select “Store as Global Variable” (at the bottom of the dropdown list)
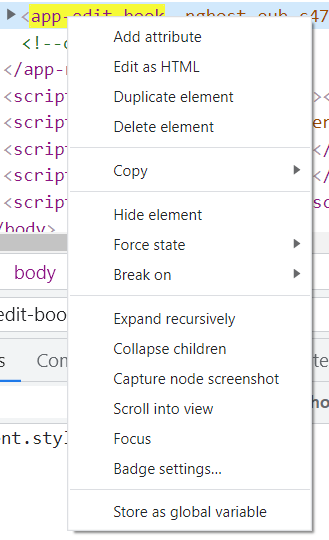
5. This will save the DOM Element object as a variable. The name will be temp1 and it will show up in the developer’s tools ‘console drawer’. (Next variable will be temp2 and so on).
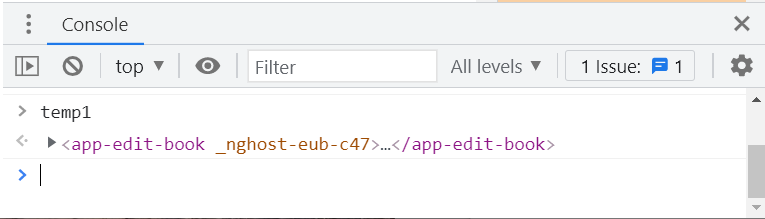
6. In the Console type this and hit enter:
ng.getComponent(temp1)
7. You should now be able to expand the instance of EditBookComponent and look at its internal state (such as the book variable).

Part 7 – Debugging a Background Service
The book-store application gets its data from the book’s rest-service. There are several types of errors that can occur if the background rest-service is not running or is not configured correctly.
With the application running in the browser and the developer’s tools open to the “Network” tab we will take a look at how network file and data transfers can be monitored.
1. Open the application in a browser and go to the main page.
2. Open the developer’s tools (F12)
3. Click on the “Network” tab in the developer’s tools.

4. Click on the “Fetch/XHR” filter:

5. Now refresh the browser tab holding the application.
6. You should see “books” as one of the transferred items.

7. Click on “books”. This will reveal details about the data transfer.
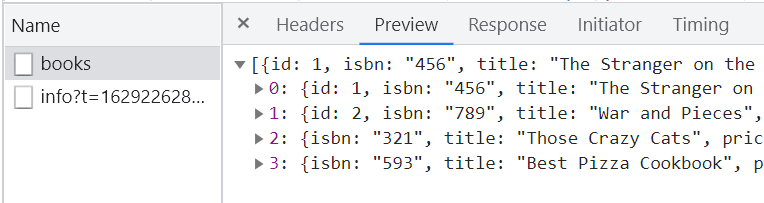
The section to the right has these tabs: “Headers”, “Preview”, “Response”, “Initiator”, and “Timing.
8. Click on “Headers” to see information about the HTTP request:
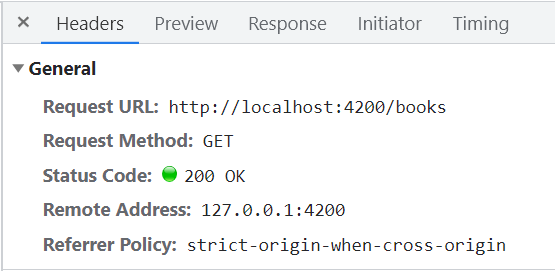
Status Code may vary.
9. From here we can see that the request was of type GET and the URL being retrieved was “http://localhost:4200/books” and the status of 200 which means the request was successful.
10. Find the terminal where you started the rest-server.
11. Hit Ctrl-C from that terminal to stop the books rest-server and press Y.
12. Go back to the browser and refresh the tab that is displaying the book-store application.
13. The “Network” tab of the developer’s tools should still be showing. Click on “books”like you did before. Then click on the “Headers” tab. The status should have changed to 504 Gateway Timeout (which means it failed).
14. Return to the rest-server terminal and restart it with this command:
npm run rest-server
15. Repeat the following steps:
- Refresh the application tab in the browser.
- Click on “books” in the Network tab.
- Click on the “headers” tab.
The status should be back to 200 OK.

Part 8 – Clean Up
1. Go to each Terminal and press CTRL + C, and press Y to stop the running process, then close the Terminal.
2. Close VS Code.
3. Close the browser.
Part 9 – Review
In the tutorial, we learned techniques to investigate errors in Angular applications including:
- Using Logging Statements for Debugging
- Detecting Compile Errors
- Detecting Template Errors
- Using Break Points with TypeScript code
- Inspecting a Component using the JS Console
- Debugging a Background Service