This tutorial is adapted from the Web Age course https://www.webagesolutions.com/courses/WA3204-introduction-to-kafka-for-c-developers.
In this tutorial, you will add Kafka support to an existing ASP.NET .NET Core MVC 3.1 application. The website will allow user registration. Each user registration request will be sent to a Kafka topic named user-registration.
The overall architecture looks like this:

You’ll need to do the initial setup in order to follow the steps below in the tutorial.
Part 1 – Explore an existing ASP.NET Core MVC web frontend
In this part, you will explore an existing ASP.NET Core MVC application. The UI and the essential controller logic is already implemented. You will add the code needed to integrate the application with the Kafka cluster.
1. Using File Explorer, navigate to C:\LabFiles.
2. Extract kafka-aspnet-frontend.zip under C:\LabWorks.
Note: If the C:\LabWorks directory doesn’t exist, create it before copying the directory.
Download kafka-aspnet-frontend.zip from below link:
3. Open Visual Studio Code (VSCode).
Note: The lab instructions will use Visual Studio Code. You can also choose to use
Visual Studio if it’s available to you.
4. In VSCode, click File | Auto Save.
This will ensure the files are automatically saved when changes are made to them.
5. In VSCode, click File | Open Folder and select the
C:\LabWorks\kafka-aspnet-frontend directory.
6. You may need to click Yes, I trust the authors to continue.
7. On the menu bar, click Terminal | New Terminal.
8. In the terminal window, execute the following command to build the sample application:
dotnet build9. After the build process completes, execute the following command to run the ASP.NET Core MVC application in the built-in webserver:
dotnet run --urls=http://localhost:808010. Open the Chrome browser. If Chrome is not available, you can use Microsoft Edge.
11. In the browser, navigate to the following URL:
http://localhost:808012. On the menu bar, click Register.

Notice the site looks like this:

The site isn’t operation yet. You will add the code later in the lab.
13. In the terminal window, press Ctrl+C to stop the built-in webserver.
Take a moment to review code in the following files:the
- Models\UserRegistrationModel.cs (This file contains the model for the User Registration form)
- Controllers\Home.cs (This file is already customized for the user registration form. It contains the GET & POST actions for the Register User button.)
- Views\Home\Register.cshtml (This file contains the UI for user registration form.)
Part 2 – Create a Kafka Topic
In this part, you will create a Kafka topic named user-registration that will be utilized from an ASP.NET Core MVC application.
1. Open a Command Prompt and change directory to \confluent\
Note: is the location where you extracted the confluent tool as part of the Confluent Cloud CLI lab.
2. Log on to Confluent Cloud by executing the following command:
confluent login –save
Enter your credentials if prompted.
3. Execute the following command to list environments available on Confluent Cloud:
confluent environment list
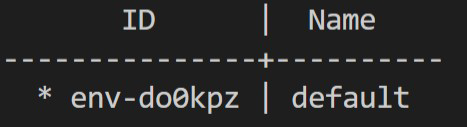
4. Make a note of ID assigned to the default environment. Here’s the sample ID assigned to the environment.
5. Execute the following command to use the default environment:
confluent environment useNote: Don’t forget to use the ID you obtained in the previous step.
6. Execute the following command to list Kafka clusters available in the environment:
confluent kafka cluster listHere’s the sample output. Make a note of the Id value in the first column.

7. Execute the following command to use the Kafka cluster whose Id value you noted
in the previous step:
confluent kafka cluster use
8. Execute the following command to create a topic named user-registration that you
will use later in the ASP.NET Core project:
confluent kafka topic create user-registration9. Execute the following command to ensure the Kafka topic was successfully created:
confluent kafka topic list
Part 3 – Obtain the api-key and cluster endpoint
The ASP.NET Core MVC client application requires an api-key so it can connect to the
Kafka cluster. In this part, you will generate the api-key and also obtain the cluster endpoint.
1. Execute the following command to obtain the cluster list:
confluent kafka cluster listMake a note of the Id listed in the first column.
2. Execute the following command to generate a new api-key and see it in a human-friendly way:
confluent api-key create --resource --output humanNote: Don’t forget to use the cluster Id you obtained in the previous step.
Notice the output looks like this.

3. Save the API Key and Secret values in notepad since it will be utilized in various labs, including this one.
4. Execute the following command to obtain the Kafka cluster endpoint:
confluent kafka cluster describe
5. In notepad, save the Endpoint excluding the SASL_SSL:// prefix.
For example: pad-levqd.us-west4.gcp.confluent.cloud:9092
Part 4 – Add packages to the project
In this part, you will add packages required for working with Kafka to your project.
1. In the terminal window, execute the following commands one at a time to add the
required packages to your project:
dotnet add package Confluent.Kafka -v 1.9.0
dotnet add package Newtonsoft.Json -v 13.0.1
Confluent.Kafka is required to add the Kafka integration to your project. It contains various classes that helps you to work with topics and also to produce and consume messages.
Newtonsoft.Json lets you serialize objects to JSON and deserialize it from JSON back to the object. You will use this package later in the lab to serialize user registration data to JSON.
2. In VSCode open kafka-aspnet-frontend.csproj file and notice the following packages are added:
<ItemGroup>
<PackageReference Include=”Confluent.Kafka” Version=”1.9.0″>
<PackageReference Include=”Newtonsoft.Json” Version=”13.0.1″>
</ItemGroup>
3. Execute the following command to run the ASP.NET Core MVC application in the built-in webserver:
dotnet watch run --urls=http://localhost:8080Note: Don’t forget to add the watch argument. The watch argument will be very handy later in the lab. You will make changes to the source code and the watch argument will automatically rebuild your application and re-host it in the built-in webserver.
Part 5 – Add the produce message functionality to the ASP.NET Core MVC application
In this part, you will implement the the Register User functionality. The form contents
will be converted to JSON and then write to the user-registration custom Kafka topic.
1. In VSCode, open Controllers\HomeController.cs.
2. Near the top of the file, below the existing namespaces, add the following namespaces:
using Confluent.Kafka;
using Newtonsoft.Json;
These namespaces contain classes that are required to integrate the application with Kafka and to manipulate JSON data. You will use various classes from these namespaces later in the lab.
3. In the HomeController class, locate the comment
// TODO: deliveryHandler method and add the following code:
void deliveryHandler(DeliveryReport deliveryReport)
{
if (deliveryReport.Error.Code == ErrorCode.NoError)
{
Debug.WriteLine($"\n* Message delivered to:
({deliveryReport.TopicPartitionOffset}) with these details:");
Debug.WriteLine($"-- Key: {deliveryReport.Key},\n-- Timestamp:
{deliveryReport.Timestamp.UnixTimestampMs}");
}
else
{
Debug.WriteLine($"Failed to deliver message with error:
{deliveryReport.Error.Reason}");
}
}
This customer method will be used as a callback handler by your code that will produce messages in the user-registration Kafka topic. The if part will be called when there is no error and the else part will be called when there’s an error while trying to send the message to Kafka.
Note: The Debug.WriteLine messages will only show up if you run the application in
Debug mode.
4. In the HomeController class, locate the comment // TODO: Produce method and
add the following code:
void Produce(string topicName, string key, string value, ClientConfig
config)
{
using (IProducer producer = new
ProducerBuilder(config).Build())
{
double flushTimeSec = 7.0;
Message message = new Message { Key
= key, Value = value };
producer.Produce(topicName, message, deliveryHandler);
Debug.WriteLine($"Produced/published message with key:
{message.Key} and value: {message.Value}");
var queueSize =
producer.Flush(TimeSpan.FromSeconds(flushTimeSec));
if (queueSize > 0)
{
Debug.WriteLine($"WARNING: Producer event queue has not been
fully flushed after {flushTimeSec} seconds; {queueSize} events
pending.");
}
}
}
The ProduceBuilder class uses the Kafka configuration to create an IProducer object that uses the Produce method to write a message to the user-registration Kafak topic. The method also specifies a callback method so it can find it if the message was successfully written to the topic.
5. Inside the Register POST method, locate the comment
// TODO: client config – hard-coded and add the following Kafka configuration code.
(Note: Don’t forget to replace Kafka cluster Endpoint, API key, and API secret with
values you noted earlier in the lab):
ClientConfig clientConfig = new ClientConfig();
clientConfig.BootstrapServers = "";
clientConfig.SecurityProtocol = SecurityProtocol.SaslSsl;
clientConfig.SaslMechanism = SaslMechanism.Plain;
clientConfig.SaslUsername = "";
clientConfig.SaslPassword = "";
clientConfig.SslCaLocation = "probe";
The code uses the ClientConfig class provided by the Confluent Kafka package to configure the cluster endpoint and the API-key based credentials.
6. Inside the Register POST method, locate the comment // TODO: Register logic and add the following code shown in bold.
string topicName = "user-registration";
string key = Guid.NewGuid().ToString();
model.UserId = key;
string message = JsonConvert.SerializeObject(model);
Produce(topicName, model.UserId, message, clientConfig);
ViewBag.Message = "User registration request is sent to the server.";
return View(model);
}
The lines in bold specifies user-registration topic name, generates a new GUID, assigns it to UserId, converts the contents of the form available in the model object to JSON, and calls the Produce helper function to write it to the Kafka topic.
TROUBLESHOOTING: Ensure your code in VSCode got compiled and the built-in webserver restarted by itself. Once in a while, the watch argument doesn’t work. In that case, press Ctrl+C, and run the dotnet watch run urls=http://localhost:8080 command
again.
Part 6 – Test out the Produce functionality
In this part, you will test the produce functionality. You will start the confluent CLI consumer and the ASP.NET Core MVC application that will write messages to the Kafka topic. For now, you will use the Confluent CLI consumer to view the messages.
1. In the terminal where you ran the confluent CLI commands earlier in the lab, execute the following
command to start the Confluent CLI consumer. (Note: It is a single command.):
confluent kafka topic consume user-registration --cluster --api-key --api-secret
Note: Don’t forget to use the values you noted for cluster Id (NOT the endpoint), API key, and API secret.
The following output should show up if the CLI consumer starts up successfully.
Starting Kafka Consumer. Use Ctrl-C to exit.
2. Switch to the browser where you have http://localhost:8080 open and click the Register menu item.
3. Enter values in the fields and click the Register User button.
4. Switch to the Confluent CLI consumer and notice a message like this shows up:
(Note: The values will vary depending on what you entered in the form):

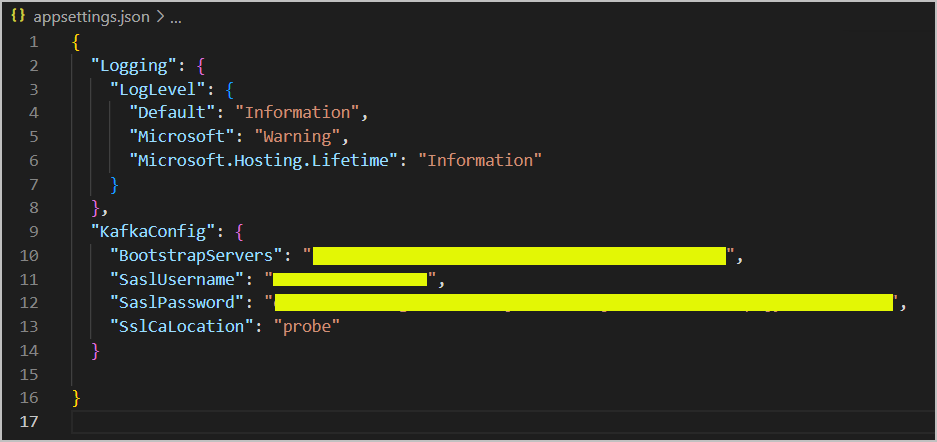
Part 7 – Move the Kafka configuration code to appsettings.json
1. In VSCode, open appsettings.json and add the code after the closing “Logging” and
before the last closing }. (Note: Don’t forget to add the comma before adding
“KafkaConfig”:
,
"KafkaConfig": {
"BootstrapServers": "",
"SaslUsername": "",
"SaslPassword": "",
"SslCaLocation": "probe"
}
Don’t forget to replace the cluster endpoint, API key & secret with values you noted in the previous parts of the lab.
It should look like this but with your values:
2. In VSCode, open Models\KafkaConfigModel.cs
3. In the class, below the // TODO: kafka config comment, add the following class:
public class KafkaConfigModel
{
public string BootstrapServers { get; set; }
public string SaslUsername { get; set; }
public string SaslPassword { get; set; }
public string SslCaLocation { get; set; }
}
Notice you are matching the property names to the properties that were used in the
appsettings.json file.
4. In VSCode, open Startup.cs and locate the comment
// TODO: map configuration file in the ConfigureServices method.
5. Below the comment add the following code to map the appsettings section to your
custom class:
services.Configure(Configuration.GetSection("KafkaConfig"));6. In VSCode, open Controllers\HomeController.cs.
7. Below the existing using statements on the top of the file, add the following using
statement shown in bold:
using Confluent.Kafka;
using Newtonsoft.Json;
using Microsoft.Extensions.Options;
8. In the HomeController class, locate the comment
// TODO: appsettings/dependency injection and add the code shown in bold:
private readonly ILogger _logger;
// TODO: appsettings/dependency injection
private readonly IOptions _appSettings;
public HomeController(ILogger logger,
IOptions appSettings)
{
_logger = logger;
_appSettings = appSettings;
}
In these lines, the KafkaConfigModel class that is mapped to the appsettings.json
section is injected in to the HomeController by using the dependency injection concept
supported by ASP.NET Core MVC.
9. In the HomeController class, locate the comment
// TODO: GetKafkaConfig method and add the following code:
// TODO: GetKafkaConfig method
ClientConfig GetKafkaConfig()
{
ClientConfig clientConfig = new ClientConfig();
clientConfig.BootstrapServers = _appSettings.Value.BootstrapServers;
clientConfig.SecurityProtocol = SecurityProtocol.SaslSsl;
clientConfig.SaslMechanism = SaslMechanism.Plain;
clientConfig.SaslUsername = _appSettings.Value.SaslUsername;
clientConfig.SaslPassword = _appSettings.Value.SaslPassword;
clientConfig.SslCaLocation = _appSettings.Value.SslCaLocation;
return clientConfig;
}
Notice the method constructs the ClientConfig object by reading values from the appsettings.json file.
10. In the Register POST method, locate the comment
// TODO: client config – hard-coded and comment out the following statements:
// ClientConfig clientConfig = new ClientConfig();
// clientConfig.BootstrapServers = "";
// clientConfig.SecurityProtocol = SecurityProtocol.SaslSsl;
// clientConfig.SaslMechanism = SaslMechanism.Plain;
// clientConfig.SaslUsername = "";
// clientConfig.SaslPassword = "";
// clientConfig.SslCaLocation = "probe";
11. In the same Register method, locate the comment
// TODO: client config with appsettings/dependency injection and add the following
code shown in bold:
// TODO: client config with appsettings/dependency injection
ClientConfig clientConfig = GetKafkaConfig();
Part 8 – Test the application
1. Ensure there are no syntax errors and the code is auto-compiled by the watch
argument. If you don’t see the built-in webserver restarting in the VSCode terminal, press
Ctrl+C in the terminal and run the command:
dotnet watch run --urls=http://localhost:80802. Switch back to the browser where the Register page is open.
3. Enter values in the fields and click the Register User button.
4. Switch to the Confluent CLI consumer and ensure the record was successfully sent
to the Kafka topic.
Part 9 – (OPTIONAL) Challenge Exercise – Add support for deleting
and creating a topic
In this optional/challenge exercise, you will use the AdminClient capabilities to delete
and create a Kafka topic. The solution is available in the C:\LabFiles\solutions directory.
1. Add two buttons to the Register page: (1) Delete Topic (2) Create Topic.
2. On Delete Topic button click, add the logic to delete the user-registration Kafka topic.
3. On Create Topic button click, add the logic to create the user-registration Kafka topic.
Part 10 – Clean-up
1. In VSCode terminal, press Ctrl+C to stop the built-in webserver.
2. In the terminal where Confluent CLI consumer is running, press Ctrl+C
3. Keep the terminal window and VSCode running for the next lab.
Part 11 – Review
In this tutorial, you added Kafka support to an existing ASP.NET Core MVC application.