Disclaimer- You will need a specific setup in order to follow all the steps in the tutorial. At Web Age, this setup is provided to students by setting up the VMS and sharing them with students. Sharing VMs in the blog is not possible as it is proprietary, but this tutorial will give you a good sense to understand the topic.
This tutorial is adapted from the Web-Age course WA2639-Devops with Jenkins, Terraform and Hashicorp Stack.
In this tutorial, you’ll learn how to:
- Work with virtual machines using Vagrant,
- Setup Ansible to manage a Linux server
- Run ad-hoc Ansible commands
- Provision an nginx web server on a remote machine
 Part 1 – The Virtual Machine (VM) Setup
In the real world, computing resources can be of various types such as:
Physical Server Computers (Linux, Windows, etc.)
Virtual Server Machines (VMs, VMWare, VirtualBox, etc.)
Cloud Server Instances (AWS, Azure, Google Cloud, Digital Ocean, etc.)
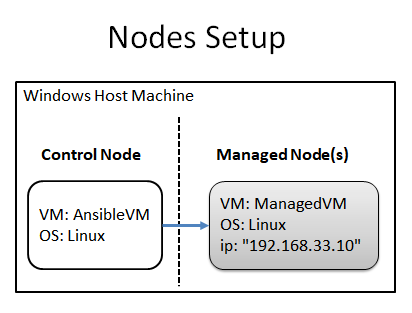
For this tutorial, two systems need to be set up; one is for Ansible and the other for a node that you will manage using Ansible. The systems should be set up using Vagrant. The following Vagrant commands to start, stop and check on the systems
Vagrant Commands:
vagrant up 	-	Starts the system
vagrant status	-	Tells if the system is running or not
vagrant ssh	-	Opens a shell into the system
vagrant halt	- 	Stops the system
vagrant reload - 	Updates the system if needed
1. Download the files from here. Open a terminal and navigate to the AnsibleVM directory.
Let’s take a look at AnsibleVM’s Vagrantfile.
2. Open the ‘Vagrantfile’ in an editor.
gedit Vagrantfile
Gedit is a GUI-based editor.
Nano is a terminal/text-based editor. Essential nano commands include:
Ctrl-o {enter} – saves your changes
Ctrl-x – exits the editor
The Vagrantfile is in Ruby format. It starts off like this:
# -*- mode: ruby -*-
# vi: set ft=ruby :
# All Vagrant configuration is done below. The "2" in Vagrant.configure
# configures the configuration version (we support older styles for
# backwards compatibility). Please don't change it unless you know what
# you're doing.
Vagrant.configure("2") do |config|
  # added
  config.vm.provider "virtualbox" do |vb|
	vb.name = "AnsibleVM"
  end
...
The format of the file follows that of a Ruby programming language script and includes a lot of commented lines. The comments are there as a guide showing the types of statements you might want to set in the file.
If we remove all the commented lines from our Vagrant script file we see that is it actually quite short:
Vagrant.configure("2") do |config|
  config.vm.provider "virtualbox" do |vb|
      vb.name = "AnsibleVM"
  end
  config.vm.box = "hashicorp/bionic64"
end
The third line above sets the name that VirtualBox will display in its GUI.
The fifth line tells Vagrant which type of VM to download and install. In this case, it is pointing to a 64bit Ubuntu-Bionic Linux VM that’s been made available by ‘hashicorp’ (the makers of Vagrant). Many different types of VM ‘Boxes’ can be found at: https://app.vagrantup.com/boxes/search
3. Close the Vagrantfile.
4. Navigate to the ManagedVM directory:
5. Open the Vagrantfile script from the ManagedVM directory.
gedit Vagrantfile
If we take away all of the commented lines it looks like this:
Vagrant.configure("2") do |config|
  config.vm.network "private_network", ip: "192.168.33.10"
  config.vm.provider "virtualbox" do |vb|
	vb.name = "ManagedVM"
  end
  config.vm.box = "hashicorp/bionic64"
end
This is almost the same as what we saw in the AnsibleVM version of the file except for the second line which instructs Vagrant to make the VM available at the given ip address: 192.168.33.10
Now that we know a little bit about the Vagrant setup we can go ahead and start up the VMs.
6. Close the Vagrantfile editor.
7. While still in the ManagedVM directory, check the VM’s status by executing the following command:
vagrant status
This should return some text, including:
default poweroff (virtualbox)
This indicates that the VM is not currently running.
8. Start the VM with this command:
vagrant up
9. When it is done the cursor should reappear at the terminal prompt. Check the status again:
vagrant status
This time you should see the following:
default running (virtualbox)
Now that the VM is up you can shell into it.
10. Execute the following command to open up a shell into the ManagedVM:
vagrant ssh
This will open a shell with the following prompt:
vagrant@vagrant:~$
11. Execute the Linux ‘pwd’ command to see what directory you are in:
pwd
It should show:
/home/vagrant
12. Use the linux ‘ls’ command to list the contents of the directory:
ls
It should show the following ‘marker’ file that was created during setup. Its purpose is to remind you which VM you are in. (the marker file in the AnsibleVM is named ‘InAnsibleVM’):
InManagedVM
13. Open up a new terminal and navigate to the AnsibleVM directory:
14. Use the following commands to check the status of the VM and then start it up:
vagrant status
vagrant up
15. Check the status again to make sure the VM is running:
vagrant status
16. Use the following command to create a shell into the AnsibleVM:
vagrant ssh
The following prompt should appear. You may notice that it looks the same as the prompt we opened into the ManagedVM.
vagrant@vagrant:~$
17. Use the Linux ‘ls’ command to list the contents of the current directory:
ls
It should list a ‘marker’ file named:
InAnsibleVM
You should also see the directory:
ansible-project
18. Navigate into the ansible-project directory:
cd ansible-project
19. List the directory contents:
ls
You should see two files:
ansible.cfg
hosts.ini
In the next section of this tutorial, we’ll take a look at these files and discuss how they are used by Ansible.
Part 2 – The Ansible Setup
Ansible is an Infrastructure Automation application. By specifying one or more machines along with configuration instructions Ansible will connect to the machines deploy and configure the resources.
In this section, you will explore the Ansible setup. For this tutorial, Ansible has been installed in the Linux virtual machine: “AnsibleVM”. We will pick up where we left off in the last section: in the terminal, at the AnsibleVM prompt in the ~\ansible-project directory.
1. Open the ansible.cfg file in an editor:
nano ansible.cfg
You should see the following contents:
inventory = hosts.ini
This tells ansible to use the hosts.ini file in the current directory. It is also possible to pass the location of the hosts’ file to ansible on the command line like this:
ansible -i hosts.ini …
Without these methods of passing the hosts’ location ansible will look for the hosts’ file in the following location:
etc/ansible/hosts
The ansible hosts file is commonly referred to as the “inventory” file because it holds a list (or inventory) of the machines being managed.
2. Close the ansible.cfg file.
3. Open the hosts.ini file in an editor
nano hosts.ini
You should see the following contents:
node_u1 ansible_user=root   ansible_host=127.0.0.1
node_u2 ansible_user=root   ansible_host=127.0.1.1
192.168.33.10
This file lists three servers.
4. Close the file.
5. Run the following command to see a list of the servers in the inventory(hosts) file:
ansible all --list-hosts
The list you see should include all of the hosts:
  hosts (3):
    node_u1
    node_u2
    192.168.33.10
6. Try this command to restrict the list to only the servers in the ‘nodes’ group:
ansible nodes --list-hosts
7. And finally, run this command to see just the one server in the ‘ManagedServer’ group:
ansible ManagedServer --list-hosts
The output should be:
  hosts (1):
    192.168.33.10
You may have noticed that the ip address of the ManagedServer matches the one that Vagrant has assigned for the ManagedVM virtual machine: 192.168.33.10.
One of the things we can do with ansible is to run commands on the machines listed in our inventory. For now, we will focus on the ManagedVM server. (the other servers in inventory are not currently available or are not yet set up to be managed)
8. Run the following command to run the Linux ‘ls’ list command on ManagedVM:
ansible ManagedServer -a 'ls'
Since the ‘-m module’ argument does not appear ansible defaults to the ‘command’ module with the options (-a argument) providing the command that we want to run.
You should see the following output:
192.168.33.10 | CHANGED | rc=0 >>
InManagedVM
The output shows the marker file ‘InManagedVM’ that identifies the server.
9. Try running these other ‘command’ module commands, one at a time, against ManagedVM:
ansible ManagedServer -a 'free -h'	- shows memory statistics
ansible ManagedServer -a 'pwd'		- default directory
ansible ManagedServer -a 'whoami'	- the logged-in user
Part 3 – Load an App onto ManagedVM using Ansible
In this section, you will load the ‘nginx’ web server onto ManagedVM using ansible.
First, we want to check if nginx is already installed or not. We can do this using ansible.
1. Return to the Terminal with AnsibleVM running, You should be at the ansible-project folder. The Terminal title should be shown:
vagrant@vagrant: ~/ansible-project
2. Use the following command to check if the ManagedVM is running:
ansible ManagedServer -m ping
If ManagedVM is running you will see:
192.168.33.10 | SUCCESS => {
...
    "changed": false,
    "ping": "pong"
}
If ManagedVM is not running you will see:
192.168.33.10 | UNREACHABLE! => {
    "changed": false,
    "msg": "Failed to connect to the host via ssh: ssh: connect ...",
    "unreachable": true
}
If ManagedVM is NOT running go back and start it (the same way you started the AnsibleVM)
At this point, you should have both AnsibleVM and ManagedVM up and running and you should have a shell prompt into the AnsibleVM.
3. Check if nginx is running in ManagedVM using this command :
ansible ManagedServer -b -m ansible.builtin.apt -a "name=nginx state=absent"
Since nginx is not currently installed you should get this after few seconds:
192.168.33.10 | SUCCESS => {
...
    "changed": false
}
4. Run these two commands to install nginx :
ansible ManagedServer -b -m ansible.builtin.apt -a "update_cache=true"
ansible ManagedServer -b -m ansible.builtin.apt -a "name=nginx state=present"
The first command updates the apt cache and the second installs nginx. After the second command, finishes scroll up and you should get this:
192.168.33.10 | CHANGED => {
...
    "changed": true
}
...
5. Now that nginx is installed you can use the following command to check if it is running :
ansible ManagedServer -b -m ansible.builtin.service -a "name=nginx state=stopped" | grep state
You should see:
"state": "stopped",
6. Start nginx as a service using this command :
ansible ManagedServer -b -m ansible.builtin.service -a "name=nginx state=started" | grep state
You should see:
"state": "started",
Next, we’ll create a custom html file and place it on the server. The following steps should be done from the AnsibleVM prompt that you are already using.
7. Use the nano editor to create a new file:
nano index.nginx-debian.html
8. Enter the following text into the file:
Hi From nginx on ManagedVM!
9. Save the file and exit the nano editor:
Ctrl-o {enter}
Ctrl-x
10. Now we will copy the file over to ManagedVM so that it can be served by nginx :
ansible ManagedServer -b -m ansible.builtin.copy -a "src=./index.nginx-debian.html dest=/var/www/html/"
If the copy is successful you should see something similar than this:
192.168.33.10 | CHANGED => {
    "changed": true,
    "checksum": "6c7e241e552bc3ec7037d0f8b5c3682caeb58a29",
    "dest": "/var/www/html/index.nginx-debian.html",
    "gid": 0,
    "group": "root",
    "md5sum": "675f950fea279e98025d9cd71d1ce368",
    "mode": "0644",
    "owner": "root",
    "size": 31,
    "src": "/home/vagrant/.ansible/tmp/ansible-tmp-1622918699.9-1557-115210213355920/source",
    "state": "file",
    "uid": 0
}
11. Now we will make a call to the nginx web server on ManagedVM using curl:
curl 192.168.33.10
It should return the custom html content you created earlier and copied to the server:
Hi From nginx on ManagedVM!
Part 4 – Clean up
1. Switch to the ManagedVM terminal.
2. We were in ssh prompt, so exit from ssh:
exit
3. Shut down ManagedVM.
vagrant halt
4. You should see:
default: Attempting graceful shutdown of VM...
5. Close the terminal:
exit
6. In the AnsibleVM terminal, exit the AnsibleVM prompt, shut down the AnsibleVM and close the remaining terminal:
exit
vagrant halt
exit
Part 5 – Review
In this tutorial, you learned how to:
- Work with virtual machines using Vagrant
- Setup Ansible to manage a Linux server
- Run ad-hoc Ansible commands
- Install and configure an nginx web server on a remote machine