This tutorial is adapted from Web Age course Kubernetes for Developers Training.
Security is critical to production deployments. Kubernetes offers several features to secure your environment:
authentication
authorization
Role, ClusterRole, RoleBinding, ClusterRoleBinding
network policies
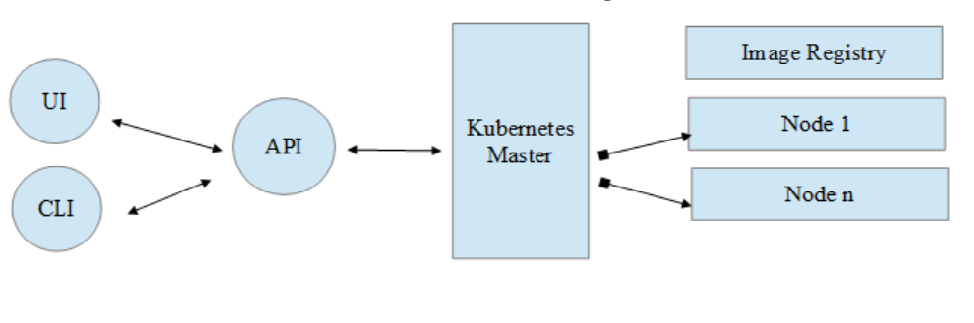
Kubernetes has a built-in API server that provides access to objects, such as nodes, pods, deployments, services, secrets, config maps, and namespaces. These objects are exposed via simple REST API through which basic CRUD operations are performed. API Server acts as the gateway to the Kubernetes platform. Components such as kubelet, scheduler, and controller access the API via the API Server for orchestration and coordination. The distributed key/value database, etcd, is accessible only through the API Server. In the Kubernetes API, most resources are represented and accessed using a string representation of their object name, such as pods for a Pod. Some Kubernetes APIs involve a subresource, such as the logs for a Pod. A request for a Pod’s logs looks like:
GET /api/v1/namespaces/{namespace}/pods/{name}/log

Both the kubectl CLI tool and the web portal talks to the API Server. Before an object is accessed or manipulated within the Kubernetes cluster, the request needs to be authenticated by the API Server. The REST endpoint uses TLS based on the X.509 certificate to secure and encrypt the traffic. The CA certificate and client certificate information is stored in ~/.kube/config.
You can view the file using any text editor or you can also view it by running the following command:
kubectl config view
Sample ~/.kube/config file
apiVersion: v1
clusters:
- cluster:
    certificate-authority: /Users/test/.minikube/ca.crt
    server: https://192.168.99.100:8443
  name: minikube
contexts:
- context:
    cluster: minikube
    user: minikube
  name: minikube
current-context: minikube
kind: Config
preferences: {}
users:
- name: minikube
  user:
    client-certificate: /Users/test/.minikube/client.crt
    client-key: /Users/test/.minikube/client.key
The file ca.crt represents the CA used by the cluster. The client.crt and client.key files map to the user minikube that is the default cluster-admin. Kubectl uses these certificates and keys from the current context to encode the request.
When a valid request hits the API Server, it goes through three stages before it is either allowed or denied.
- Authentication
- Authorization
- Admission Controller

1.7 Authentication
After the request gets past TLS, it passes through the authentication phase that involves authentication modules. Authentication modules are configured by the administrator during the cluster creation process. Examples of authentication modules: client certificates, password, plain tokens, bootstrap tokens, and JWT tokens (used for service accounts). Details of authentication modules are available on the Kubernetes website: https://kubernetes.io/docs/reference/access-authn-authz/authentication/
Client certificates are the default and most common scenario. External authentication mechanisms provided by OpenID, Github, or even LDAP can be integrated with Kubernetes through one of the authentication modules.
After authentication, the next step is to determine whether the operation is allowed or not.
For authorizing a request, Kubernetes looks at three aspects:
- the username of the requester – extracted from the token embedded in the header
- the requested action – one of the HTTP verbs like GET, POST, PUT, DELETE mapped to CRUD operations
- the object affected by the action – one of the valid Kubernetes objects such as a pod or a service.
Kubernetes determines the authorization based on an existing policy. By default, Kubernetes follows the philosophy of closed-to-open, which means an explicit allow policy is required to even access the resources. Like authentication, authorization is configured based on one or more modes/modules, such as:
Attribute-based access control (ABAC) defines an access control paradigm whereby access rights are granted to users through the use of policies that combine attributes. ABAC uses a policy file where one JSON object is listed per line. Each line in the JSON policy file is a policy object.
If you are using the Minikube distribution, you can enable ABAC authorization like this:
minikube start --extra-config=apiserver.AuthorizationMode=ABAC --extra-config=apiserver.AuthorizationPolicyFile=/path/to/your/abac/policy.json
Versioning properties:
- apiVersion: “abac.authorization.kubernetes.io/v1beta1”
- kind: “Policy”
spec: property set to a map with the following properties:
Subject-matching properties:
- user: “userName“
- group: “groupName” | system:authenticated | system:unauthenticated
Resource-matching properties:
- apiGroup: “*” | “extensions“
- namespace: “*” | “your_custom_namespace”
- resource: “*” | “pods” | “deployments” | “services“, …
Non-resource-matching properties:
- nonResourcePath: “/version” | “*”
readonly: true | false, type boolean, when true, means that the Resource-matching policy only applies to get, list, and watch operations, Non-resource-matching policy only applies to get operation.
Alice can do anything to all resources:
{"apiVersion": "abac.authorization.kubernetes.io/v1beta1", "kind": "Policy", "spec": {"user": "alice", "namespace": "*", "resource": "*", "apiGroup": "*"}}
The Kubelet can read any pods:
{"apiVersion": "abac.authorization.kubernetes.io/v1beta1", "kind": "Policy", "spec": {"user": "kubelet", "namespace": "*", "resource": "pods", "readonly": true}}
The Kubelet can read and write events:
{"apiVersion": "abac.authorization.kubernetes.io/v1beta1", "kind": "Policy", "spec": {"user": "kubelet", "namespace": "*", "resource": "events"}}
Bob can just read pods in namespace “projectCaribou”:
{"apiVersion": "abac.authorization.kubernetes.io/v1beta1", "kind": "Policy", "spec": {"user": "bob", "namespace": "projectCaribou", "resource": "pods", "readonly": true}}
Anyone can make read-only requests to all non-resource paths:
{"apiVersion": "abac.authorization.kubernetes.io/v1beta1", "kind": "Policy", "spec": {"group": "system:authenticated", "readonly": true, "nonResourcePath": "*"}}
{"apiVersion": "abac.authorization.kubernetes.io/v1beta1", "kind": "Policy", "spec": {"group": "system:unauthenticated", "readonly": true, "nonResourcePath": "*"}}
Role-based access control (RBAC) is a method of regulating access to a computer or network resources based on the roles of individual users within your organization.
RBAC authorization uses the rbac.authorization.k8s.io API group to drive authorization decisions, allowing you to dynamically configure policies through the Kubernetes API.
RBAC authorization involves the following resources:
- Role
- CluserRole
- RoleBinding
- ClusterRoleBinding
RBAC is the default authorization mode. If you want to explicitly specify this mode, you can use the following command with the Minikube distribution:
minikube start --extra-config=apiserver.Authorization.Mode=RBAC
An RBAC Role or ClusterRole contains rules that represent a set of permissions.
Role – always sets permissions within a particular namespace. When you create a Role, you have to specify the namespace it belongs in. Treat it as a project-based role where a user will have to access to a specific namespace.
ClusterRole – is a non-namespaced resource. Use it to create admin users who can define permissions on namespaced resources and be granted within an individual namespace(s). It defines permissions on cluster-scoped resources, such as nodes. For example, you can use a ClusterRole to allow a particular user to run kubectl get pods –all-namespaces. The resources have different names (Role and ClusterRole) because a Kubernetes object always has to be either namespaced or not namespaced; it can’t be both.
Here’s an example Role in the “marketing” namespace that can be used to grant read access to pods:
apiVersion: rbac.authorization.k8s.io/v1
kind: Role
metadata:
  namespace: marketing
  name: marketing-pod-reader
rules:
- apiGroups:  # "" indicates the core API group
  resources:
  verbs:
Here is an example of a ClusterRole that can be used to grant read access to nodes:
apiVersion: rbac.authorization.k8s.io/v1
kind: ClusterRole
metadata:
  # "namespace" omitted since ClusterRoles are not namespaced
  name: nodes-reader
rules:
- apiGroups:
  #
  # at the HTTP level, the name of the resource for accessing Secret
  # objects is "nodes"
  resources: ["nodes"]
  verbs:
A role binding grants the permissions defined in a role to a user or set of users. It holds a list of subjects (users, groups, or service accounts), and a reference to the role being granted. A RoleBinding grants permissions within a specific namespace whereas ClusterRoleBinding grants that access cluster-wide. A RoleBinding may reference any Role in the same namespace. If you want to bind a ClusterRole to all the namespaces in your cluster, you use a ClusterRoleBinding.
Here is an example of a RoleBinding that grants the “pod-reader” Role to the user “alice” within the “sales” namespace. This allows “alice” to read pods in the “default” namespace.
apiVersion: rbac.authorization.k8s.io/v1
kind: RoleBinding
metadata:
  name: read-pods
  namespace: sales
subjects:
- kind: User
  name: alice
  apiGroup: rbac.authorization.k8s.io
roleRef:
  kind: Role
  name: pod-reader
  apiGroup: rbac.authorization.k8s.io
The following ClusterRoleBinding allows any user in the group “manager” to read deployments in any namespace.
apiVersion: rbac.authorization.k8s.io/v1
kind: ClusterRoleBinding
metadata:
  name: read-deployment-global
subjects:
- kind: Group
  name: manager
  apiGroup: rbac.authorization.k8s.io
roleRef:
  kind: ClusterRole
  name: deployment-reader
  apiGroup: rbac.authorization.k8s.io
A special-purpose authorization mode that grants permissions to kubelets based on the pods they are scheduled to run. To learn more about using the Node authorization mode
In Attribute-based access control (ABAC), access rights are granted to users through the use of policies that combine attributes. The policies can use any type of attributes (user attributes, resource attributes, object, environment attributes, etc). To enable ABAC mode, specify –authorization-policy-file=SOME_FILENAME and –authorization-mode=ABAC on startup.
After authorization, the request goes through the final stage: Admission Controller. Admission controllers limit requests to create, delete, modify, or connect to (proxy). They do not support read requests. For example, an admission control module may be used to enforce the pulling of images policy each time a pod is created. There are various admission controllers compiled into the kube-apiserver binary. Here are some of them:
- AlwaysPullImages: When this admission controller is enabled, images are always pulled before starting containers, which means valid credentials are required
- CertificateApproval: This admission controller observes requests to ‘approve’ CertificateSigningRequest resources
For more details, refer to Kubernetes doc: https://kubernetes.io/docs/reference/access-authn-authz/admission-controllers/
1.22 Network Policies
Network policies are the equivalent of a firewall that specify how groups of pods are allowed to communicate with each other and other network endpoints. Each network policy has a podSelector field, which selects a group of pods. When a pod is selected by a network policy, the network policy is applied to it. Each network policy also specifies a list of allowed (ingress and egress) connections. When the network policy is created, all the pods that it applies to are allowed to make or accept the connections listed in it. If no network policies are applied to a pod, then no connections to or from it would be permitted. Network policies require a network plugin that enforces network policies. Although Kubernetes allows the creation of network policies they aren’t enforced unless a plugin is installed and configured. There are various plugins, such as Calico, Cilium, Kube-router, Romana, and, Weave Net.
You can apply various network policies, such as:
- Limit access to services
- Pod isolation
- Allow internet access for pods
- Allow pod-to-pod communication within the same or different namespaces.
You can get various useful network policy recipes available from the following sites:
https://github.com/ahmetb/kubernetes-network-policy-recipes
https://github.com/stackrox/network-policy-examples
Pods are “isolated” if at least one network policy applies to them; if no policies apply, they are “non-isolated”. Network policies are not enforced on non-isolated pods. This behavior exists to make it easier to get a cluster up and running a user who does not understand network policies can run their applications without having to create one. It’s recommended you start by applying a “default-deny-all” network policy. The effect of the default-deny-all policy specification is to isolate all pods, which means that only connections explicitly listed by other network policies will be allowed.
apiVersion: networking.k8s.io/v1
kind: NetworkPolicy
metadata:
  name: default-deny-all
spec:
  podSelector: {}
  policyTypes:
  - Ingress
Since network policies are namespaced resources, you will need to create this policy for each namespace. You can do so by running kubectl -n <namespace> create -f <filename> for each namespace.
With just the default-deny-all policy in place in every namespace, none of your pods will be able to talk to each other or receive traffic from the Internet. For most applications to work, you will need to allow some pods to receive traffic from outside sources.
The following network policy allows traffic from all sources for pods having the custom networking/allow-internet-access=true label:
apiVersion: networking.k8s.io/v1
kind: NetworkPolicy
metadata:
  name: internet-access
spec:
  podSelector:
    matchLabels:
      networking/allow-internet-access: "true"
  policyTypes:
  - Ingress
  ingress:
  - {}
When you create new deployments, they will not be able to talk to anything by default until you apply a network policy. You can create custom network policies that allow deployments/pods labeled networking/allow-all-connections=true to talk to all other pods in the same namespace.
apiVersion: networking.k8s.io/v1
kind: NetworkPolicy
metadata:
  name: allow-ingress-from-new
spec:
  podSelector: {}
  policyTypes:
  - Ingress
  ingress:
  - from:
    - podSelector:
        matchLabels:
          networking/allow-all-connections: "true"
---
apiVersion: networking.k8s.io/v1
kind: NetworkPolicy
metadata:
  name: allow-ingress-to-new
spec:
  podSelector:
    matchLabels:
      networking/allow-all-connections: "true"
  policyTypes:
  - Ingress
  ingress:
  - from:
    - podSelector: {}
In this tutorial, you learned the following:
- Security Overview
- Accessing the API
- Authentication
- Authorization
- ABAC and RBAC
- Admission Controller
- Network Policies