In this tutorial, you will learn how to use Eclipse to write Java code.
Part 1 – Start Eclipse and Explore the IDE
Eclipse is a Java Integrated Development Environment (IDE). It is a GUI-driven and tool-assisted program that we can use to develop Java code in an effective and efficient manner. While developing Java code does not necessarily require an IDE (all the exercises in this lab guide could be achieved by using a simple text editor and the command line compiler), using an IDE will greatly simplify development and decrease coding time. As such, we will use Eclipse to develop all our code in this tutorial.
Install Eclipse before you start working on this tutorial.
It can be downloaded from here.
We will begin by launching Eclipse and exploring some of its facets.
1. Open a file browser and navigate to C:\Software\eclipse.
2. Run eclipse.exe by double clicking on the file.
The Workspace Launcher dialog will appear.
3. Change the Workspace to C:\workspace as shown below.
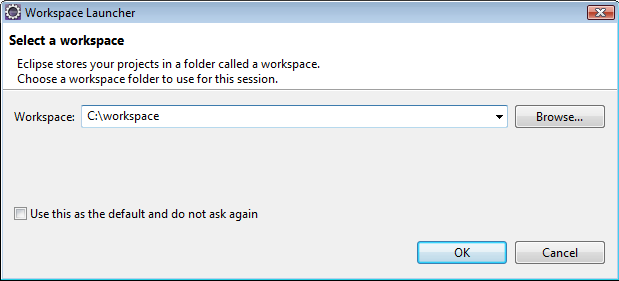 4. Click OK.
Eclipse will start, and the Welcome screen may be shown.
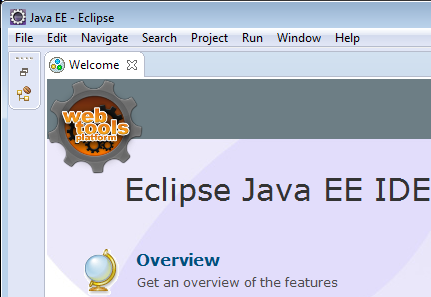 5. Close the Welcome screen.
6. From the menu bar, select Window | Perspective | Open Perspective | Java.

What has happened? Simple: you have changed perspective. A perspective in Eclipse is a collection of views chosen to achieve a specific task. We are currently looking at the Java perspective, for which Eclipse opens the appropriate views.
A view is simply a tiled window in the Eclipse environment. For example, in the screen shot above, you can see the Package Explorer view, the Task List view, and part of the Outline view.
Look at your Eclipse environment and locate the following views:
The Problems view. This should be at the bottom of the Eclipse environment. Any coding/compile errors you make will be displayed here and (in a fit of unbridled pessimism) you will most likely be referring to this view quite a bit.

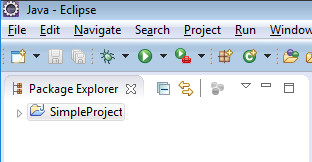
The Package Explorer. This is on the left of the IDE.

This will allow us to navigate through the Java classes we will be creating shortly.
7. Open the Javadoc view. To find it, click the Javadoc tab next to the Problems tab.
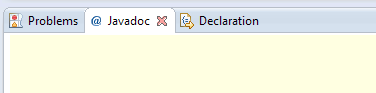
8. You can switch between the two views by clicking the appropriate tabs.
9. Similarly, locate the Declaration view.
The big empty space in the middle of the IDE does not look very interesting right now; that is because it is the Code view – and we currently do not have any code to display. Do not worry about it for now.
10. Each view can be moved and resized. Click on the Package Explorer tab and drag it over the area where the Problems view is. Note that the view “docks”. Experiment with resizing and moving. Don’t worry about “messing up” the perspective, because we will reset it in a moment.
11. From the menu bar, select Window | Perspective |Reset Perspective and click OK in the box that appears. All the views should “reset” to their original layouts. Note that it is possible to Save a perspective that you have changed. This allows you to customize exactly which views you want open and how you want them laid out. This is something you will probably do as you become more experienced with Eclipse.
Part 2 – Create A New Java Project
Before we can create any Java code, we first need to create a Java Project. A project in Eclipse is essentially a folder for related files. We will create a new project and then create our classes in that project. Later on, if we work on a completely unrelated Java class, we could then create a separate, new project and create those classes in there. This helps keep our code environment organized.
1. From the menu bar select File | New | Java Project
Eclipse can actually handle many different types of projects, depending on the code that needs to be developed. In our case, we will create a simple Java project.
The New Java Project wizard will begin.
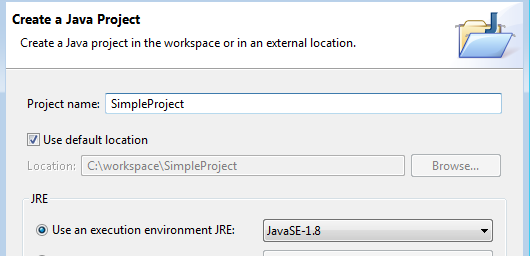
Here, we will describe the details of the Java project that will contain our simple HelloWorld Java.
2. Set the Project name: to be SimpleProject and click Finish.
The project will be created. How do you know the project was created? Simple. Look in the Package Explorer view.
You should see the newly created project listed there. Our Java code will go in this project.
Part 3 – Create a Java Class
Recall that in Java, all code must be contained within a Java class. Within a class, code is typically placed within methods, and any class can have a main method which will serve as its “executable” method.
We will now create a Java class called “HelloWorld” that will have a single main method, and this method will simply print out “Hello World” to the console.
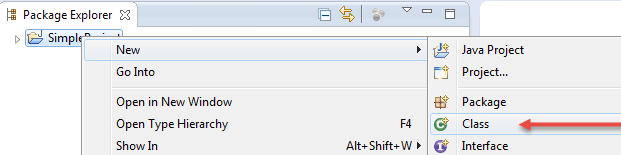
1. In the Package Explorer view, right click on SimpleProject and select New | Class
The New Java Class window will appear.
This wizard will create a new Java class for us, and allows us to specify some options on the class. When we click the Finish button on this wizard, Eclipse will generate a new Java class according to the options we specify here. Wizards like this are one of the reasons that Eclipse is so useful; while it would have been possible to generate the class ourselves, Eclipse does it much faster.
Most importantly, we need to give the class a name.
Java classes should also belong to a package, for naming convention reasons. Think of a package as a name prefix. Imagine you are working at an insurance company in a Claims department, and you create a class called Account. However, imagine that another developer that you are working with (same company, but in the Billing division) also creates a class called Account. These two classes are completely different, but have the same name. How would we know which one to use?
The answer is that each class can be placed in a package. A package is a string of characters separated by periods (e.g. com.mycompany.www). The characters can be anything (although typical Java naming convention usually has your company name or URL as a part of the package name), and it is pre-pended to the class name. So a “fully qualified” class name is the name of the class preceded by its package.
In the example above, the Billing department could be assigned a different package name from the Claims department; so there could be com.insuranceco.billing.Account and com.insuranceco.claims.Account as two separate entities. Even though the classes are both called Account, they belong to unique packages, thus allowing for differentiation.
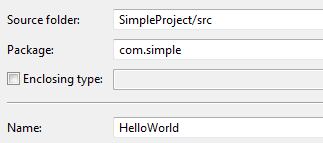
In any case, we will use the New Java Class dialog to specify a class name and package name for our new class.
2. For the Package enter com.simple and for the name, enter HelloWorld
3. In the section What method stubs would you like to create? make sure that the box for public static void main(String[] args) is checked.
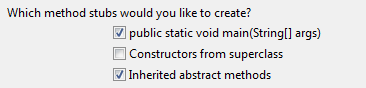
This means that when the class is created, Eclipse will automatically generate the main method for us.
You can ignore the rest of the options for now.
4. Click Finish
Eclipse will now generate the Java class. A lot has now changed in the various views. Firstly, the empty space that was in the center of the environment is now showing Java code. This is the Code Editor view, and it is showing the results of the New Java Class wizard’s generation. Examine it.

Firstly, notice that the class this view is currently showing is called HelloWorld.java. You can tell this by looking at the name of the tab.
This Code Editor view is editable. You can place the cursor inside this view and type away; this is where you will do your coding. However, before we examine the code, let us examine some of the other views.
5. Examine the Package Explorer view.
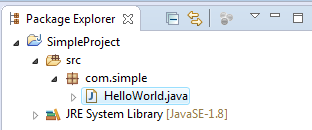
6. The Package Explorer provides us with a high-level navigable view of each project and their contents. At the moment, the only project is our SimpleProject
Note the tree structure. The top level is our project (SimpleProject) and immediately underneath that is the package com.simple
Beneath the package is our class, HelloWorld.java. If you double-clicked on it (or any other class that might be listed here), Eclipse would open it in the code editor window.
If we created new packages/classes in the project, they would similarly appear here in the tree structure.
7. Examine the Outline view.
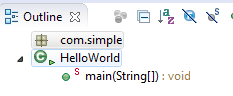
This view presents a summary of the class that is currently open in the code editor view. At the moment, it is examining the HelloWorld class (as represented by the green C) that belongs to the com.simple package. The outline is also showing that the class currently has one method: a static public method called main(String[]). We know it is a public method because of the green circle next to it, and we know that the method is static because of the S. (We will discuss the concept of static and public modifiers later on).
Remember that this view is just a summary of the Java class. As we add/remove code from the actual Java class, this view will update accordingly.
Turn your attention back to the code editor window. Let us examine the actual Java code now. All this code has been generated for us by Eclipse as a convenience.
Notice that the code is color coded. Keywords are in purple, comments are in blue and the remaining text is in black. Also notice the use of curly braces ‘{‘ and ‘}’ to denote where classes and methods end and begin.
8. Look at the first line:
package com.simple;
This the package declaration. This should always be the first line in a Java class. This line simply states that the following class belongs to the com.simple package.
9. Examine the next line:
public class HelloWorld {
Here, we declare the class. We are saying that this is a new class that is called HelloWorld and that it is public (we will discuss public modifiers later).
This is followed by an opening curly brace ‘{‘. Later, at the end of the file, this should be matched with a corresponding closing curly brace ‘}’. Locate this closing brace now.
Any code in between these braces will be considered belonging to this class. This shows the use of braces to indicate scope.
An unmatched curly brace pair will be flagged as an error and the code will refuse to compile. An important part of Java programming is learning how to properly open/close scope.
10. Examine the next few lines:
public static void main(String[] args) {
	// TODO Auto-generated method stub
}
This is a method. The first line declares the method. It is a public method that is static, and its return type is void. It also takes one argument: an array of String objects. This argument is called args.
Remember that main is a special method. Since this HelloWorld class has such a main method, it can be “run”. When the class is run, any code inside this method will be executed. Not all classes will necessarily have main methods, however.
Again, note the use of curly braces to denote where the method begins and ends. Just like the class declaration, any code that is in between these braces will be a part of this method.
Currently, the body of the method only has one line and that line is a comment that was placed there by Eclipse. A comment is a piece of non-code text that is placed within code as a note to the person reading the code. It can form the basis of documentation, or simply serve as helpful reminders as to what the code is doing for anyone reading the code. Comments in Java can either be preceded with a // sequence, or surrounded by a /* and */ sequence. Remember that this is non-code which means the compiler will not attempt to process it.
Keeping this in mind, we can see that the method currently does nothing. Let us change this now.
11. Using the editor, delete the line
// TODO Auto-generated method stub
12. Replace it with the following line:
System.out.println("Hello World");
What is this line doing? This line is invoking the println method of System.out and passing the string “Hello World” to it. System.out is an object that is provided by the Java language itself and represents the “console” (the default location where Java outputs to; typically, the screen).
println is a method that is provided for System.out and it takes one argument: a String object representing what needs to be printed. (Objects will be discussed in more detail in class)
Pay special close attention to the brackets ‘(‘ and ‘)’ as well as the trailing semi-colon. Every Java statement should end with a semi-colon.
13. Your code is complete. Save your code by going to File → Save or by typing Ctrl-S.
14. Check the Problems view. It should be empty.
If you had made any code mistakes (e.g. typos, syntax errors, etc), an item would have appeared in the list.
If any errors are there right now, go back and double check the code you typed in. Correct any mistakes you find. Do not proceed until there are no problems listed here.
15. Your code is now complete. The next step is to run it.
Part 4 – Run the Code
Now that we have completed writing the code, we can run it to see the results. Running Java code implies launching an instance of the Java Virtual Machine (JVM), and then loading the appropriate Java class and executing its main method. Fortunately for us, Eclipse makes that simple.
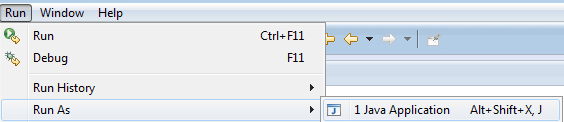
1. Click anywhere in the code editor and select Run | Run As | Java Application from the menu bar.
|
Troubleshooting |
|
If you don’t see the option Java Application under Run | Run As, click in the code editor and try again. Alternatively, you can select HelloWorld.java in the Package Explorer view. As you can see, Eclipse is context sensitive. |
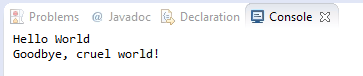
A new view (the Console view) should appear in the same area where the Problems view is. Any text sent to the console (e.g. by a call to System.out.println()) will appear in this view.
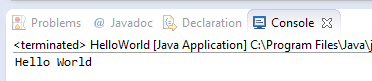
Voila! Our Java code has executed and Hello World has been printed. Congratulations. You have written and run your first Java class.
Part 5 – Change the Code
Just as an exercise, let us change the code a little.
1. Let us now introduce an error to see what sort of error handling features that Eclipse offers. Delete the closing ” mark from the println statement and save your code.
What happens?
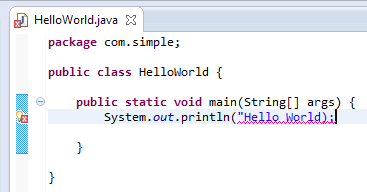
Note that a red X has appeared in the tab title (next to “HelloWorld.java”). This indicates there is an error in the class.
2. Also note that in the left margin a similar red X has appeared on the same line that the error occurs on. Finally, note that the un-closed string (“Hello World); is itself underlined in red.
3. Float the mouse cursor over the red underline.
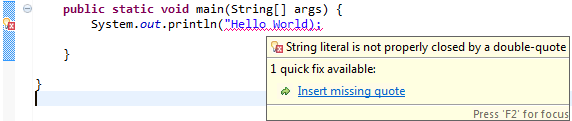
A little pop up appears with a description of the problem. This is a hint to tell you what the corrective action should be. Do no fix it yet though!
4. Locate the Problems view. Expand Errors.

Note that the error in our code has been detected. You may have to resize the Description field to see the whole text. This view shows what resource (Java file) the error occurs in, and even shows the line number. This becomes invaluable if you are working on multiple Java files. Finally, if you double click on the error listed doing so will open the editor on the exact spot where the error is. Again, this is invaluable if you are working with multiple Java files.
5. Finally, click on the red X in the left margin.
6. Two boxes pop-up. Ignore the box in yellow; it is the box in white that is interesting. Eclipse has located the error and is actually suggesting a fix!

7. Double click where it says Insert missing quote
What happens?

Eclipse has indeed added a closing quote mark, but unfortunately in the wrong location (after the semi-colon, instead of before the closing bracket). Let us see what this “fix” does.
8. Save the file.
9. Look at the Problems view. There are now two errors! So while the fix suggested by Eclipse was on the right track, it ended up doing more harm than good.
10. Fix the errors properly (by putting the quote in the right place, immediately after World and save the file. Make sure all the errors are gone.
From this, you should see that the error handling features of Eclipse are quite thorough; however, you should also see that it is not perfect. Additionally, Eclipse can only catch compile time errors (i.e. syntax errors and errors in the actual code) and not run time errors. The difference should become clear to you as work through the rest of these lab exercises.
11. Immediately after the existing System.out line, add another line of code as follows.
System.out.println("Goodbye, cruel world!");
If you are not particularly conscious about using tabs, spacing, and line breaks properly in your code (i.e. code style), it can end up looking a little disorganized. Fortunately, Eclipse can format code for us so it looks neatly arranged.
12. Right click anywhere in the code editor and select Source | Format.
If your code was not “neatly” written, it will be miraculously re-formatted to look perfectly neat and organized.
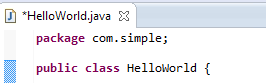
Note that in the tab for the code editor (where the file name HelloWorld.java is displayed) an asterisk has appeared. This is to indicate that the file was changed, but has not been saved.
13. Save the file. Notice that the asterisk in the code editor tab disappears, indicating the file has been saved. This means the file is “current”. There should be no errors. It should look like the following.
14. Run the code again. (To do this, go to the menu bar and select Run | Run As | Java Application.)
The console window should show your new updated output.
15. Close Eclipse by select File | Exit.
16. Confirm by clicking OK.
 Don’t worry about losing the state of your project; the next time you open Eclipse, it will remember what your last state was.
Part 6 – Review
In this tutorial, you explored Eclipse and coded your first Java class.
You saw that a Java class has a name and (usually) a package. It has methods and its method/class scope is determined by braces. You learned how to print something to the console by invoking the System.out.println command.
Using Eclipse , you created a Java project to contain the HelloWorld.java class. You learned about perspectives and views, and used wizards to generate some code for you. Finally, you also saw some of the error-handling features of Eclipse.